Creator: Chung-En Johnny Yu
Content updated: 2025-09-29
Source:
Build a Large Language Model From Scratch by Sebastian Raschka - Ch2
CS336: Language Modeling from Scratch, Spring 2025 by Stanford - Lec1
Hands-on practice this notebook on your Google Colab:
Now, run the code and practice it!
Additional resources:
Byte Pair Encoding (BPE) Tokenizer From Scratch by Sebastian Raschka
Introduction
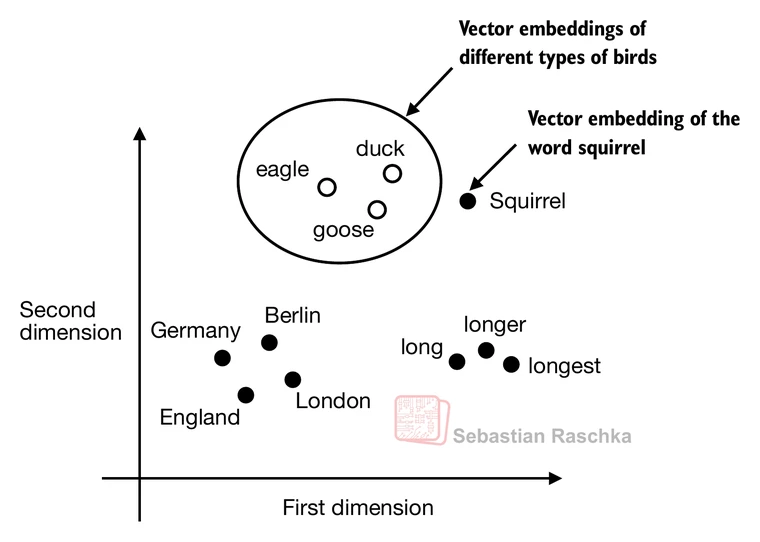
LLMs work with embeddings in high-dimensional spaces (i.e., thousands of dimensions).
Since we can’t visualize such high-dimensional spaces (we humans think in 1, 2, or 3 dimensions), the figure below illustrates a 2-dimensional embedding space.
Tokenizing text
# Packages that are being used in this notebook

from importlib.metadata import version

print("torch version:", version("torch"))
print("tiktoken version:", version("tiktoken"))
torch version: 2.8.0+cu126
tiktoken version: 0.11.0
# Fetch the-verdict.txt

import os
import urllib.request

if not os.path.exists("the-verdict.txt"):
    url = ("https://raw.githubusercontent.com/rasbt/"
           "LLMs-from-scratch/main/ch02/01_main-chapter-code/"
           "the-verdict.txt")
    file_path = "the-verdict.txt"
    urllib.request.urlretrieve(url, file_path)
# Open txt file and have a glimpse
with open("the-verdict.txt", "r", encoding="utf-8") as f:
raw_text = f.read()
print("Total number of character:", len(raw_text))
print(raw_text[:99])Total number of character: 20479
I HAD always thought Jack Gisburn rather a cheap genius--though a good fellow enough--so it was no
The goal is to tokenize and embed this text for an LLM.
Let’s develop a simple tokenizer based on some simple sample text that we can then later apply to the text above.
The following regular expression will split on whitespaces.
# Split on whitespaces

import re

text = "Hello, world. This, is a test."
result = re.split(r'(\s)', text)

print(result)
['Hello,', ' ', 'world.', ' ', 'This,', ' ', 'is', ' ', 'a', ' ', 'test.']
We don’t only want to split on whitespaces but also commas and periods, so let’s modify the regular expression to do that as well.
# Split on whitespaces, commas, periods

result = re.split(r'([,.]|\s)', text)

print(result)
['Hello', ',', '', ' ', 'world', '.', '', ' ', 'This', ',', '', ' ', 'is', ' ', 'a', ' ', 'test', '.', '']
As we can see, this creates empty strings, let’s remove them.
# Strip whitespace from each item and then filter out any empty strings

result = [item for item in result if item.strip()]
print(result)
['Hello', ',', 'world', '.', 'This', ',', 'is', 'a', 'test', '.']
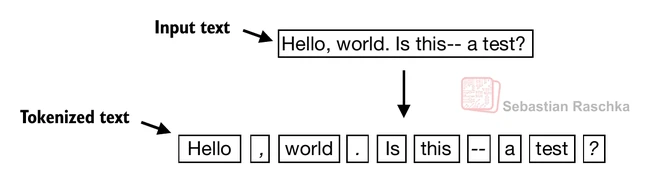
This looks pretty good, but let’s also handle other types of punctuation, such as periods, question marks, and so on.
# Handle more punctuation

text = "Hello, world. Is this-- a test?"

result = re.split(r'([,.:;?_!"()\']|--|\s)', text)
result = [item.strip() for item in result if item.strip()]
print(result)
['Hello', ',', 'world', '.', 'Is', 'this', '--', 'a', 'test', '?']
This is pretty good, and we are now ready to apply this tokenization to the raw text.
# Tokenize on the first 30 words of the fetched text

preprocessed = re.split(r'([,.:;?_!"()\']|--|\s)', raw_text)
preprocessed = [item.strip() for item in preprocessed if item.strip()]
print(preprocessed[:30])
['I', 'HAD', 'always', 'thought', 'Jack', 'Gisburn', 'rather', 'a', 'cheap', 'genius', '--', 'though', 'a', 'good', 'fellow', 'enough', '--', 'so', 'it', 'was', 'no', 'great', 'surprise', 'to', 'me', 'to', 'hear', 'that', ',', 'in']
Let’s calculate the total number of tokens.
print(len(preprocessed))4690
Converting tokens into token IDs
Next, we convert the text tokens into token IDs that we can process via embedding layers later.
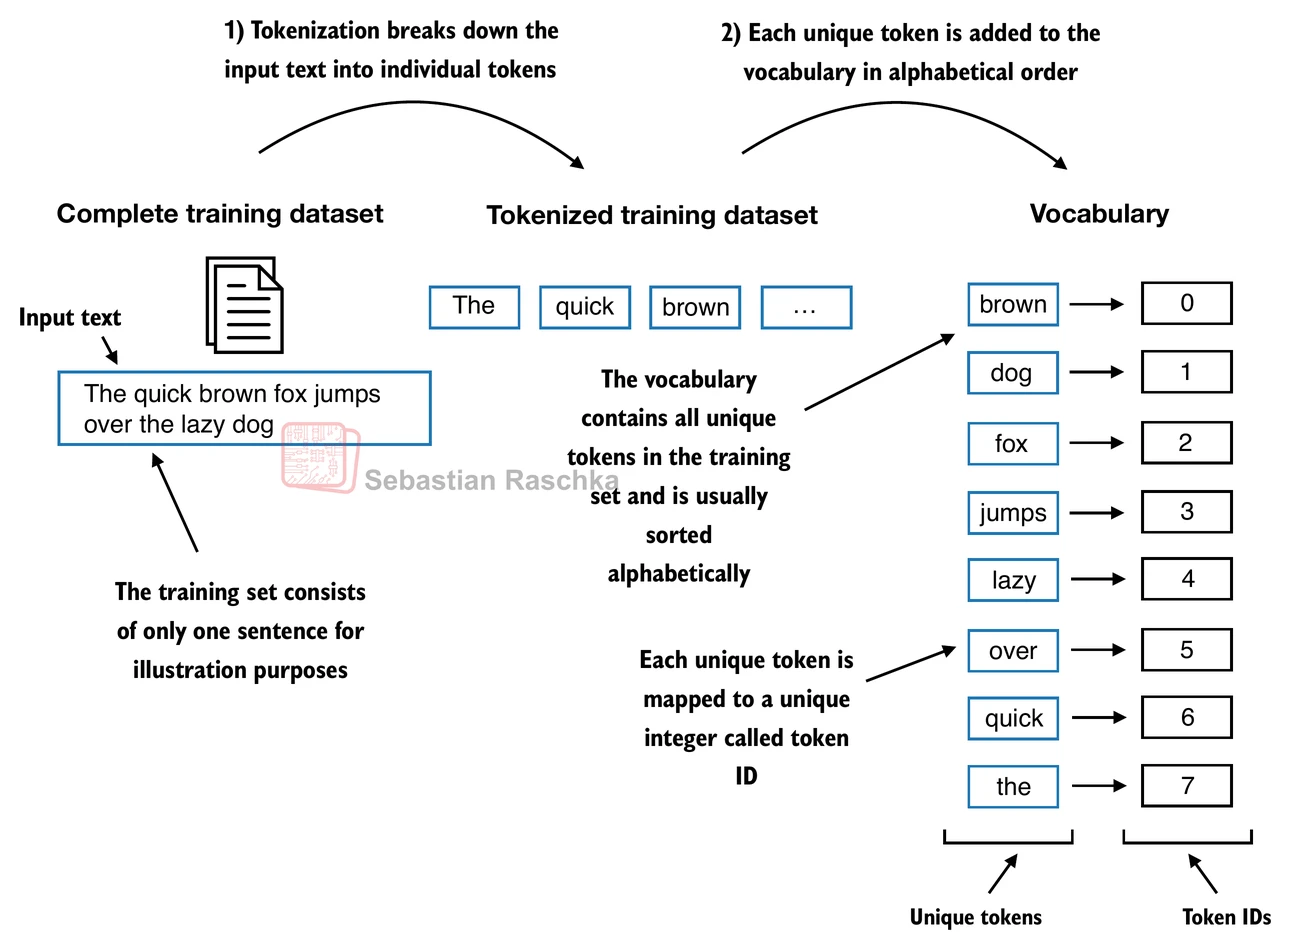
From these tokens, we can now build a vocabulary that consists of all the unique tokens
all_words = sorted(set(preprocessed))
vocab_size = len(all_words)
print(vocab_size)

vocab = {token:integer for integer,token in enumerate(all_words)}
1130
# Print the first 20 entries in this vocabulary

for i, item in enumerate(vocab.items()):
    print(item)
    if i >= 20:
        break
('!', 0)
('"', 1)
("'", 2)
('(', 3)
(')', 4)
(',', 5)
('--', 6)
('.', 7)
(':', 8)
(';', 9)
('?', 10)
('A', 11)
('Ah', 12)
('Among', 13)
('And', 14)
('Are', 15)
('Arrt', 16)
('As', 17)
('At', 18)
('Be', 19)
('Begin', 20)
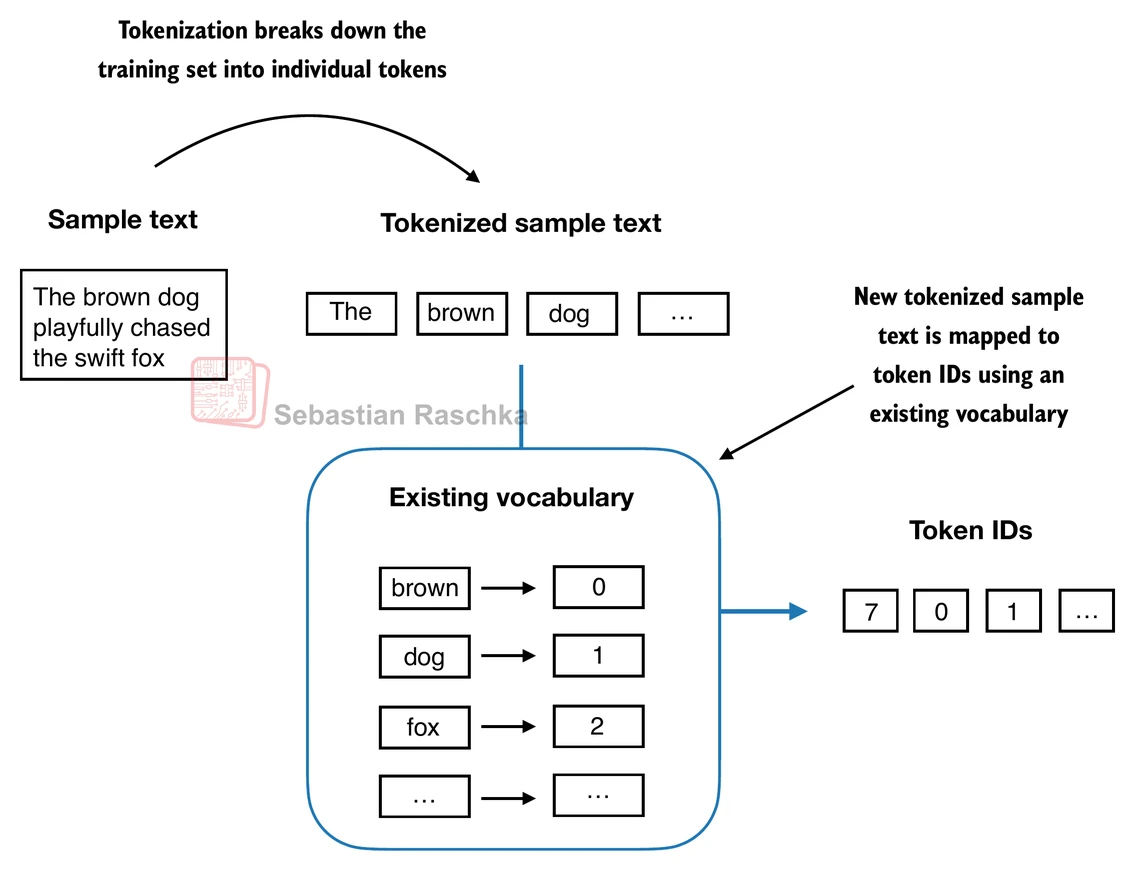
Below, we illustrate the tokenization of a short sample text using a small vocabulary.
Putting it now all together into a tokenizer class.
class SimpleTokenizerV1:
    def __init__(self, vocab):
        self.str_to_int = vocab
        self.int_to_str = {i:s for s,i in vocab.items()}

    def encode(self, text):
        """Turn text into token IDs"""
        preprocessed = re.split(r'([,.:;?_!"()\']|--|\s)', text)

        preprocessed = [
            item.strip() for item in preprocessed if item.strip()
        ]
        ids = [self.str_to_int[s] for s in preprocessed]
        return ids

    def decode(self, ids):
        """Turn token IDs back into text"""
        text = " ".join([self.int_to_str[i] for i in ids])
        text = re.sub(r'\s+([,.?!"()\'])', r'\1', text) # replace spaces before the specified punctuations
        return text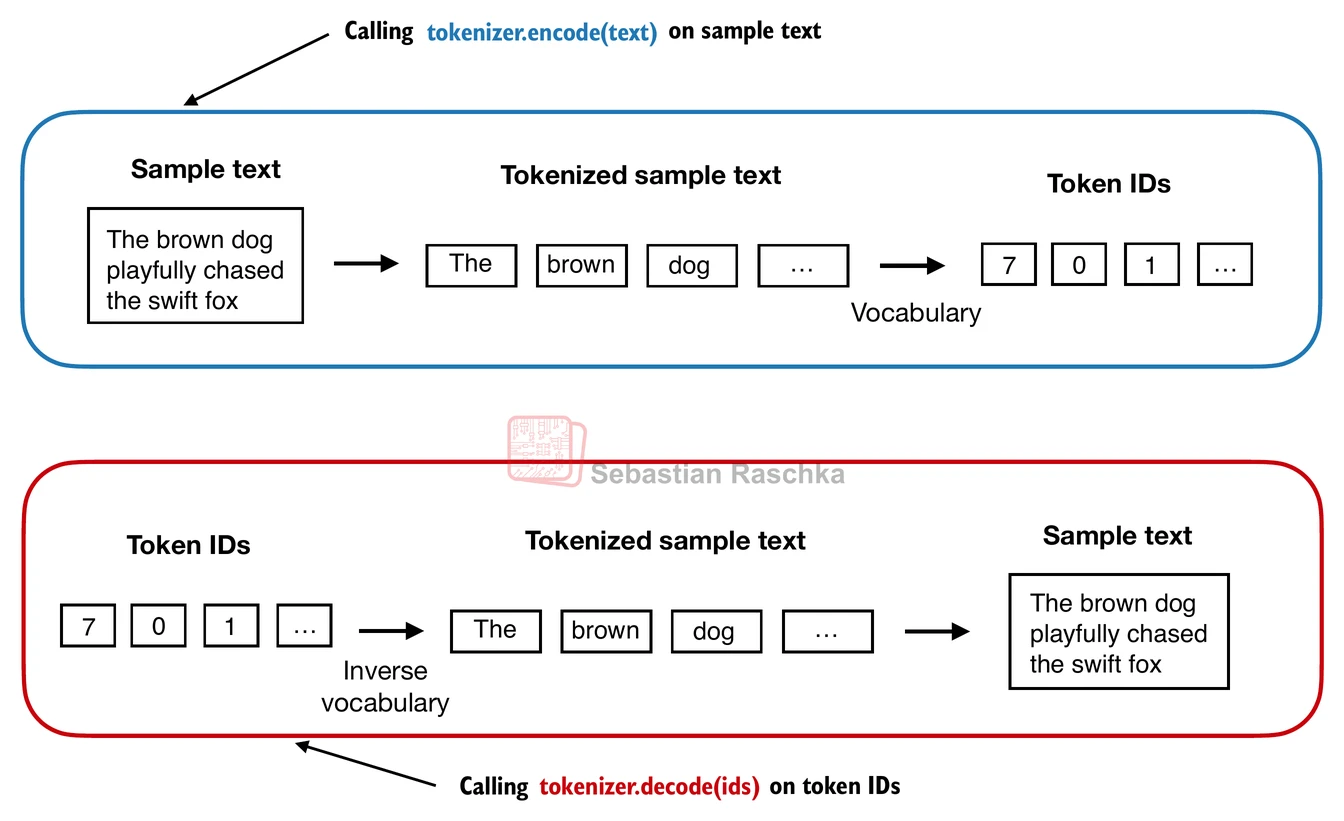
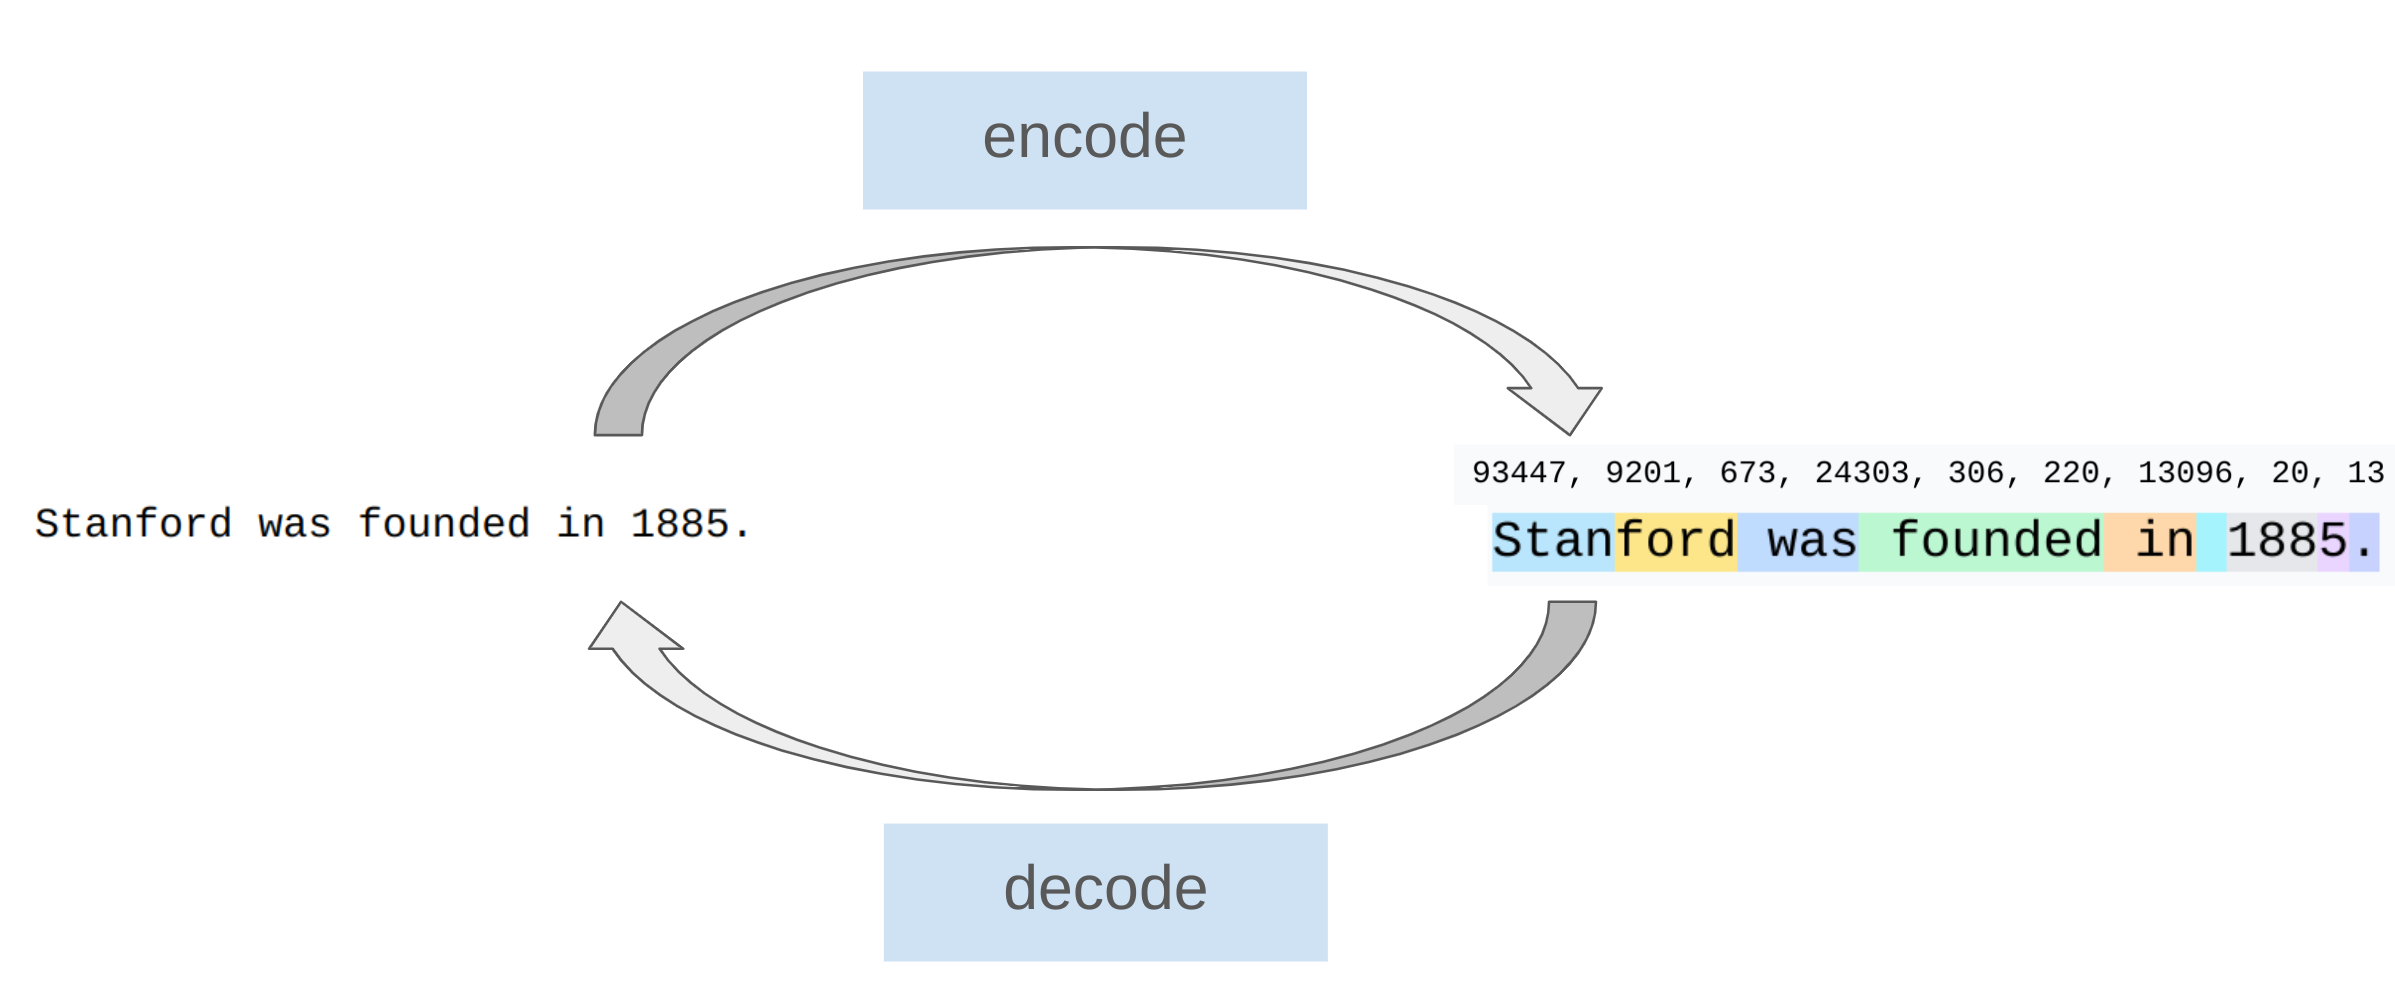
We can use the tokenizer to encode (that is, tokenize) texts into integers.
These integers can then be embedded (later) as input of/for the LLM.
tokenizer = SimpleTokenizerV1(vocab)

text = """"It's the last he painted, you know,"
           Mrs. Gisburn said with pardonable pride."""
ids = tokenizer.encode(text)
print(ids)
[1, 56, 2, 850, 988, 602, 533, 746, 5, 1126, 596, 5, 1, 67, 7, 38, 851, 1108, 754, 793, 7]
We can decode the integers back into text
tokenizer.decode(ids)tokenizer.decode(tokenizer.encode(text))Adding special tokens
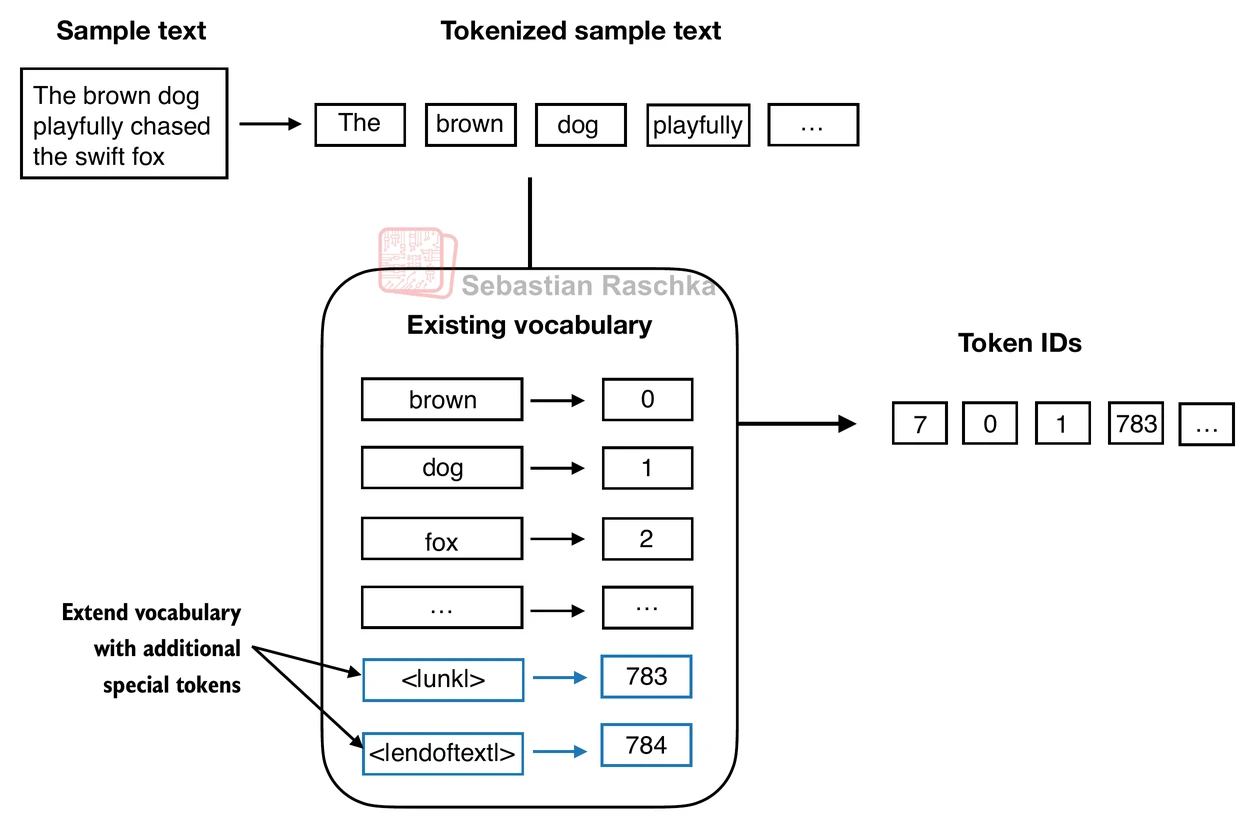
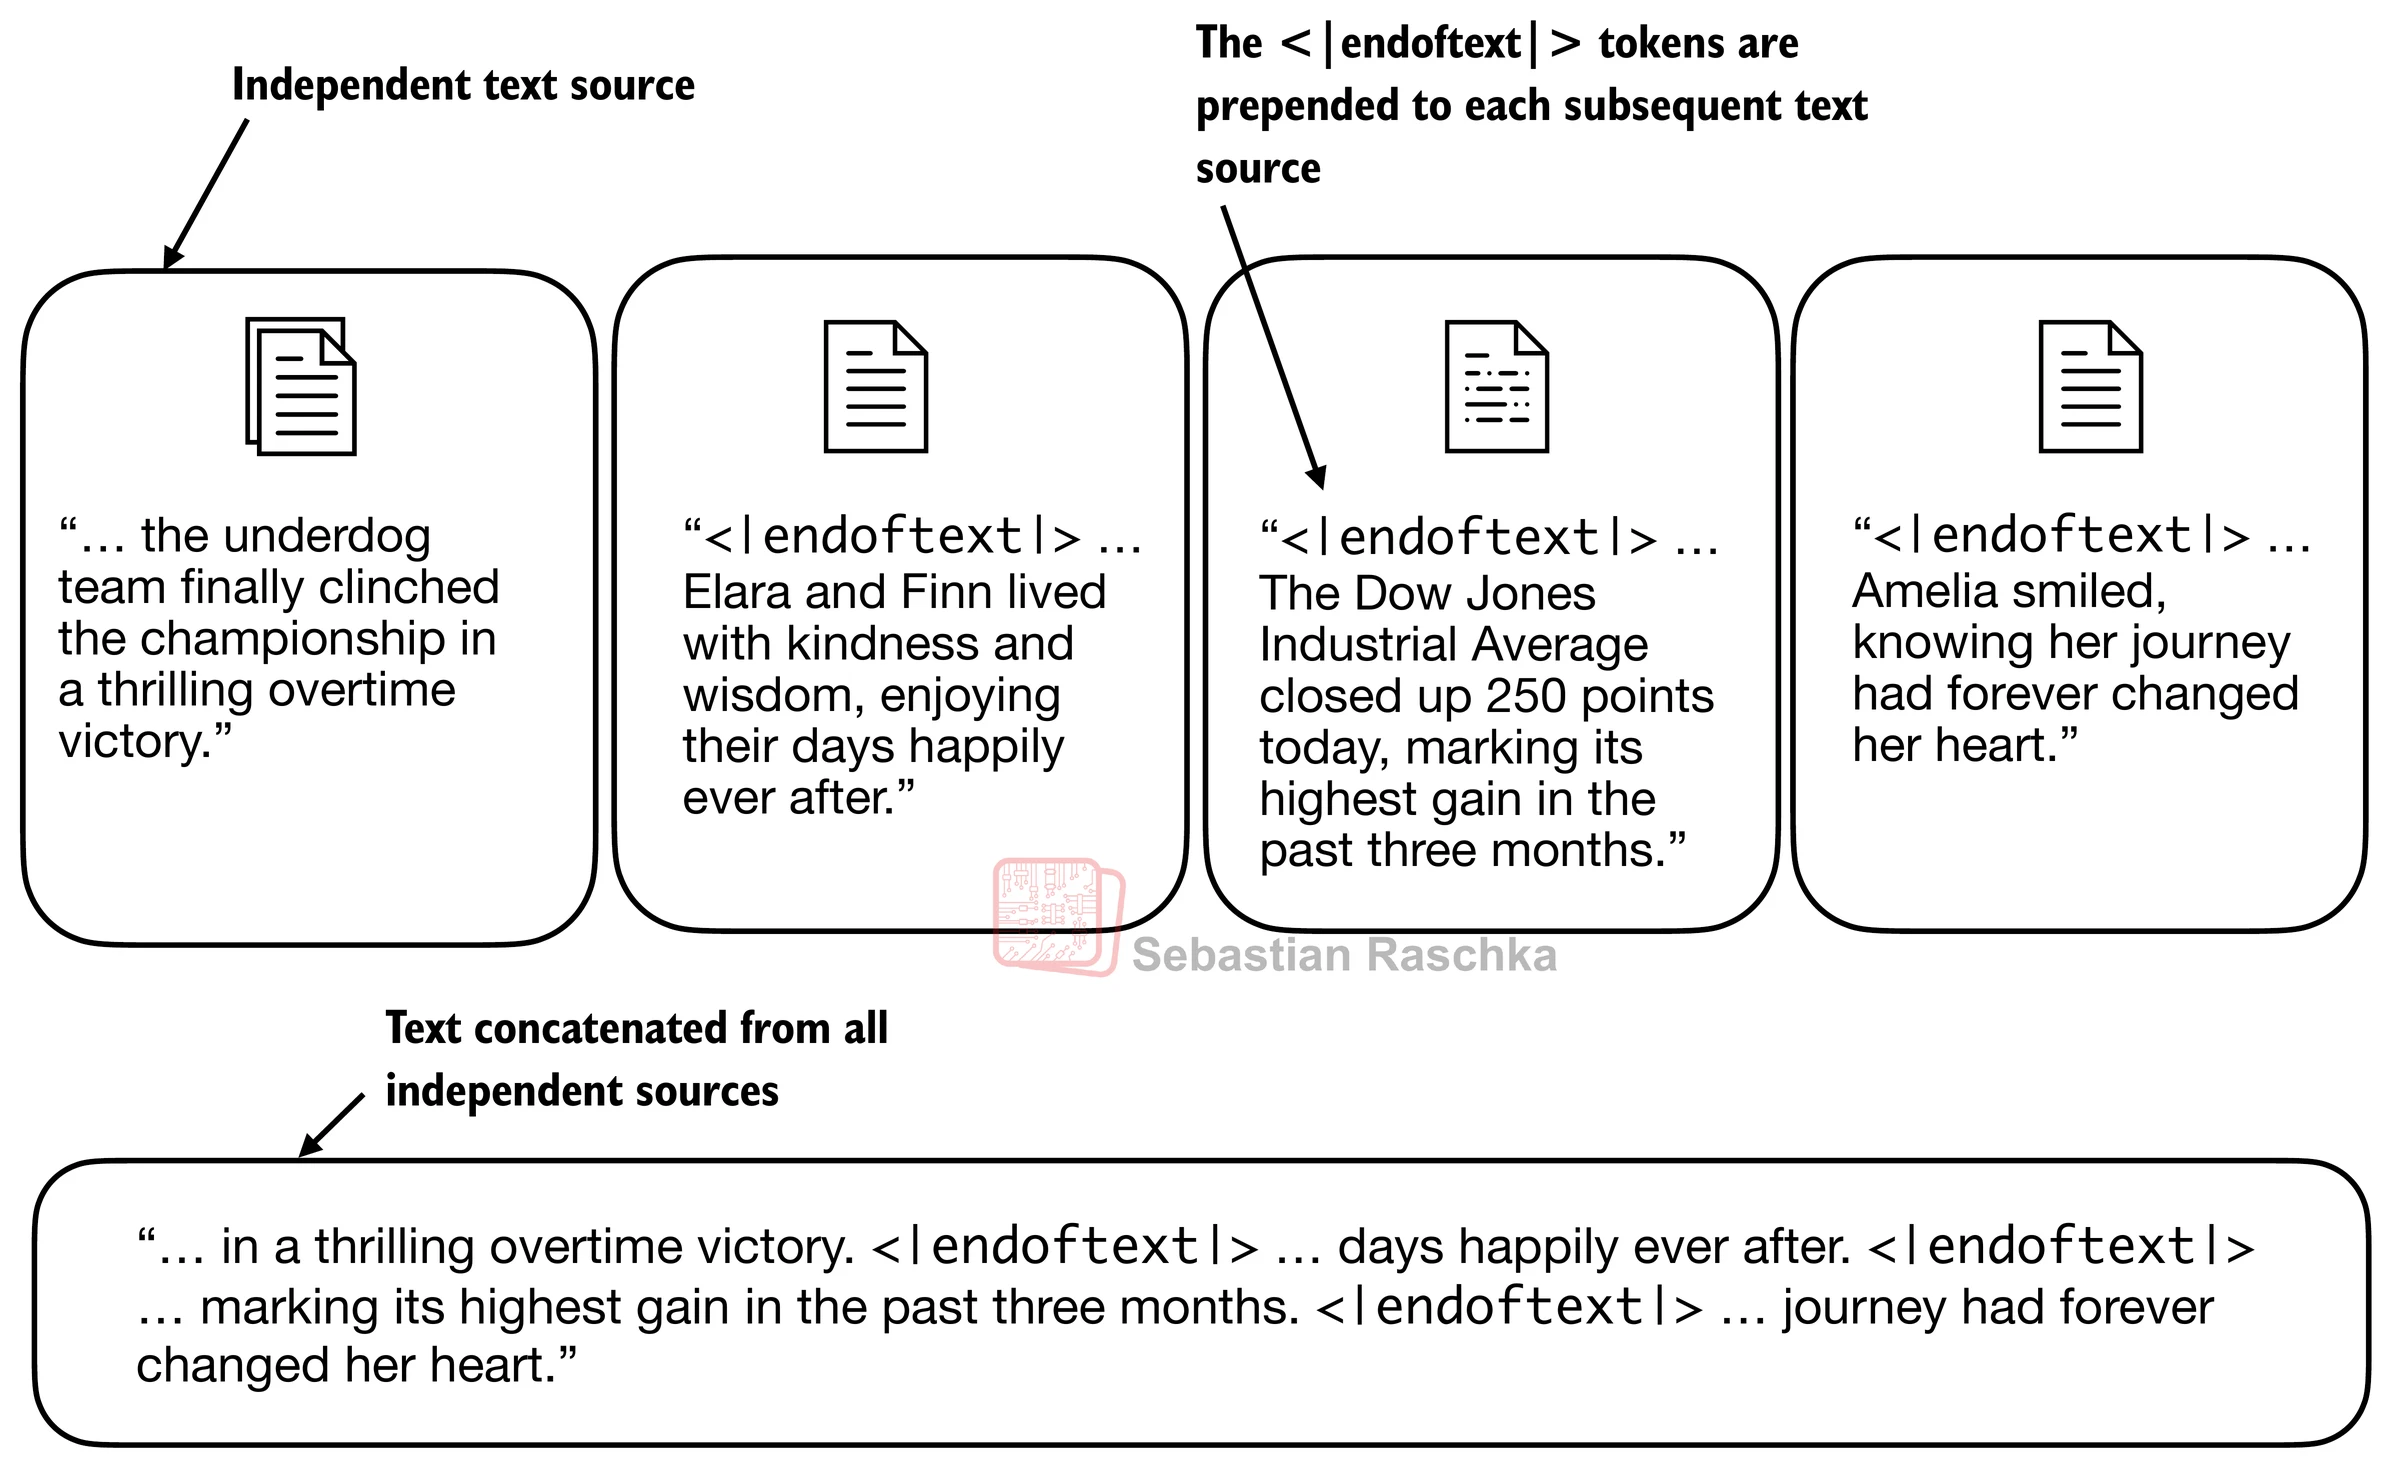
It’s useful to add some “special” tokens for unknown words and to denote the end of a text.
Some tokenizers use special tokens to help the LLM with additional context.
Some of these special tokens are:
[BOS](beginning of sequence) marks the beginning of text[EOS](end of sequence) marks where the text ends (this is usually used to concatenate multiple unrelated texts, e.g., two different Wikipedia articles or two different books, and so on)[PAD](padding) if we train LLMs with a batch size greater than 1 (we may include multiple texts with different lengths; with the padding token we pad the shorter texts to the longest length so that all texts have an equal length)[UNK]to represent words that are not included in the vocabulary
Note that GPT-2 does not need any of these tokens mentioned above but only uses an <|endoftext|> token to reduce complexity.
GPT also uses the
<|endoftext|>for padding (since we typically use a mask when training on batched inputs, we would not attend padded tokens anyways, so it does not matter what these tokens are).GPT-2 does not use an
<UNK>token for out-of-vocabulary words; instead, GPT-2 uses a byte-pair encoding (BPE) tokenizer, which breaks down words into subword units which we will discuss in a later section.
The following code produces an error because the word “Hello” is not contained in the vocabulary.
tokenizer = SimpleTokenizerV1(vocab)

text = "Hello, do you like tea. Is this-- a test?"

tokenizer.encode(text)
---------------------------------------------------------------------------
KeyError Traceback (most recent call last)
/tmp/ipython-input-2162118319.py in <cell line: 0>()
3 text = "Hello, do you like tea. Is this-- a test?"
4
----> 5 tokenizer.encode(text)
/tmp/ipython-input-1925100589.py in encode(self, text)
11 item.strip() for item in preprocessed if item.strip()
12 ]
---> 13 ids = [self.str_to_int[s] for s in preprocessed]
14 return ids
15
KeyError: 'Hello'To deal with such cases, we can add special tokens like "<|unk|>" to the vocabulary to represent unknown words.
Since we are already extending the vocabulary, let’s add another token called "<|endoftext|>" which is used in GPT-2 training to denote the end of a text (and it’s also used between concatenated text, like if our training datasets consists of multiple articles, books, etc.).
# Expand vocabulary

all_tokens = sorted(list(set(preprocessed)))
all_tokens.extend(["<|endoftext|>", "<|unk|>"])

vocab = {token:integer for integer,token in enumerate(all_tokens)}
len(vocab.items())1132# Check out the last 5 items in the vocabulary
for i, item in enumerate(list(vocab.items())[-5:]):
print(item)('younger', 1127)
('your', 1128)
('yourself', 1129)
('<|endoftext|>', 1130)
('<|unk|>', 1131)
We also need to adjust the tokenizer accordingly so that it knows when and how to use the new <unk> token.
class SimpleTokenizerV2:
    def __init__(self, vocab):
        self.str_to_int = vocab
        self.int_to_str = { i:s for s,i in vocab.items()}

    def encode(self, text):
        preprocessed = re.split(r'([,.:;?_!"()\']|--|\s)', text)
        preprocessed = [item.strip() for item in preprocessed if item.strip()]
        preprocessed = [
            item if item in self.str_to_int
            else "<|unk|>" for item in preprocessed
        ]

        ids = [self.str_to_int[s] for s in preprocessed]
        return ids

    def decode(self, ids):
        text = " ".join([self.int_to_str[i] for i in ids])
        # Replace spaces before the specified punctuations
        text = re.sub(r'\s+([,.:;?!"()\'])', r'\1', text)
        return text
Let’s try to tokenize text with the modified tokenizer:
tokenizer = SimpleTokenizerV2(vocab)

text1 = "Hello, do you like tea?"
text2 = "In the sunlit terraces of the palace."

text = " <|endoftext|> ".join((text1, text2))

print(text)
Hello, do you like tea? <|endoftext|> In the sunlit terraces of the palace.
tokenizer.encode(text)[1131, 5, 355, 1126, 628, 975, 10, 1130, 55, 988, 956, 984, 722, 988, 1131, 7]tokenizer.decode(tokenizer.encode(text))BytePair encoding (BPE)
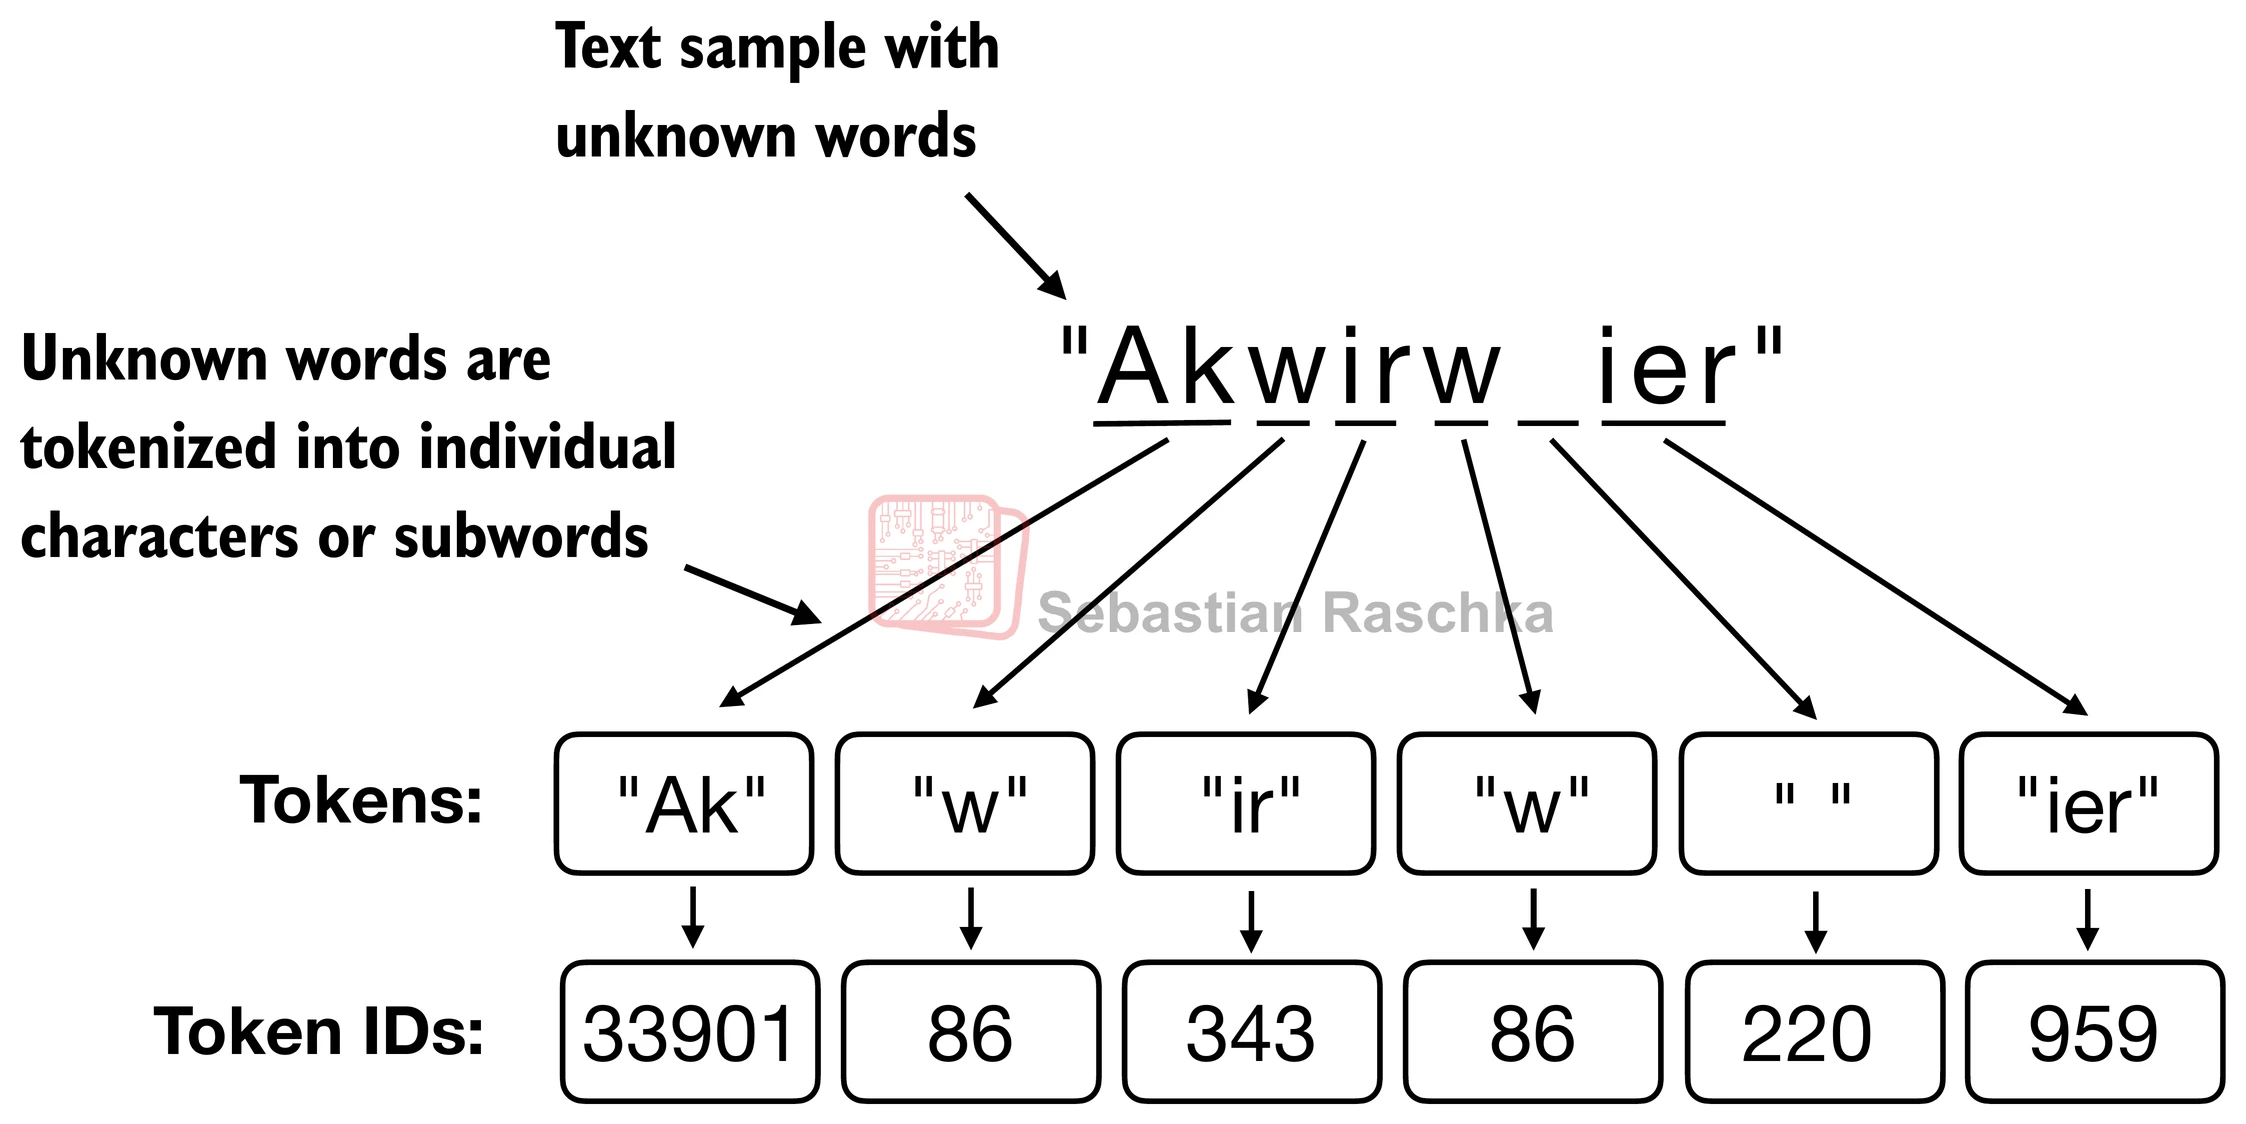
BytePair encoding (BPE) allows the model to break down words that aren’t in its predefined vocabulary into smaller subword units or even individual characters, enabling it to handle out-of-vocabulary words.
Basic idea: Train the tokenizer on raw text to automatically determine the vocabulary.
Intuition: Common sequences of characters are represented by a single token, rare sequences are represented by many tokens.
For instance, if GPT-2’s vocabulary doesn’t have the word “unfamiliarword,” it might tokenize it as [“unfam”, “iliar”, “word”] or some other subword breakdown, depending on its trained BPE merges.
GPT-2 used it as its tokenizer.
In this notebook, we are using the BPE tokenizer from OpenAI’s open-source tiktoken library, which implements its core algorithms in Rust to improve computational performance.
# pip install tiktoken# Check the package version
import importlib
import tiktoken
print("tiktoken version:", importlib.metadata.version("tiktoken"))tiktoken version: 0.11.0
tokenizer = tiktoken.get_encoding("gpt2")# Encode unknown word to relatively large token ID, e.g., 50256
text = (
"Hello, do you like tea? <|endoftext|> In the sunlit terraces"
"of someunknownPlace."
)
integers = tokenizer.encode(text, allowed_special={"<|endoftext|>"})
print(integers)[15496, 11, 466, 345, 588, 8887, 30, 220, 50256, 554, 262, 4252, 18250, 8812, 2114, 1659, 617, 34680, 27271, 13]
# Decode back to see it handle the unknown word correctly

strings = tokenizer.decode(integers)

print(strings)
Hello, do you like tea? <|endoftext|> In the sunlit terracesof someunknownPlace.
BPE tokenizers break down unknown words into subwords and individual characters:
Data sampling with a sliding window
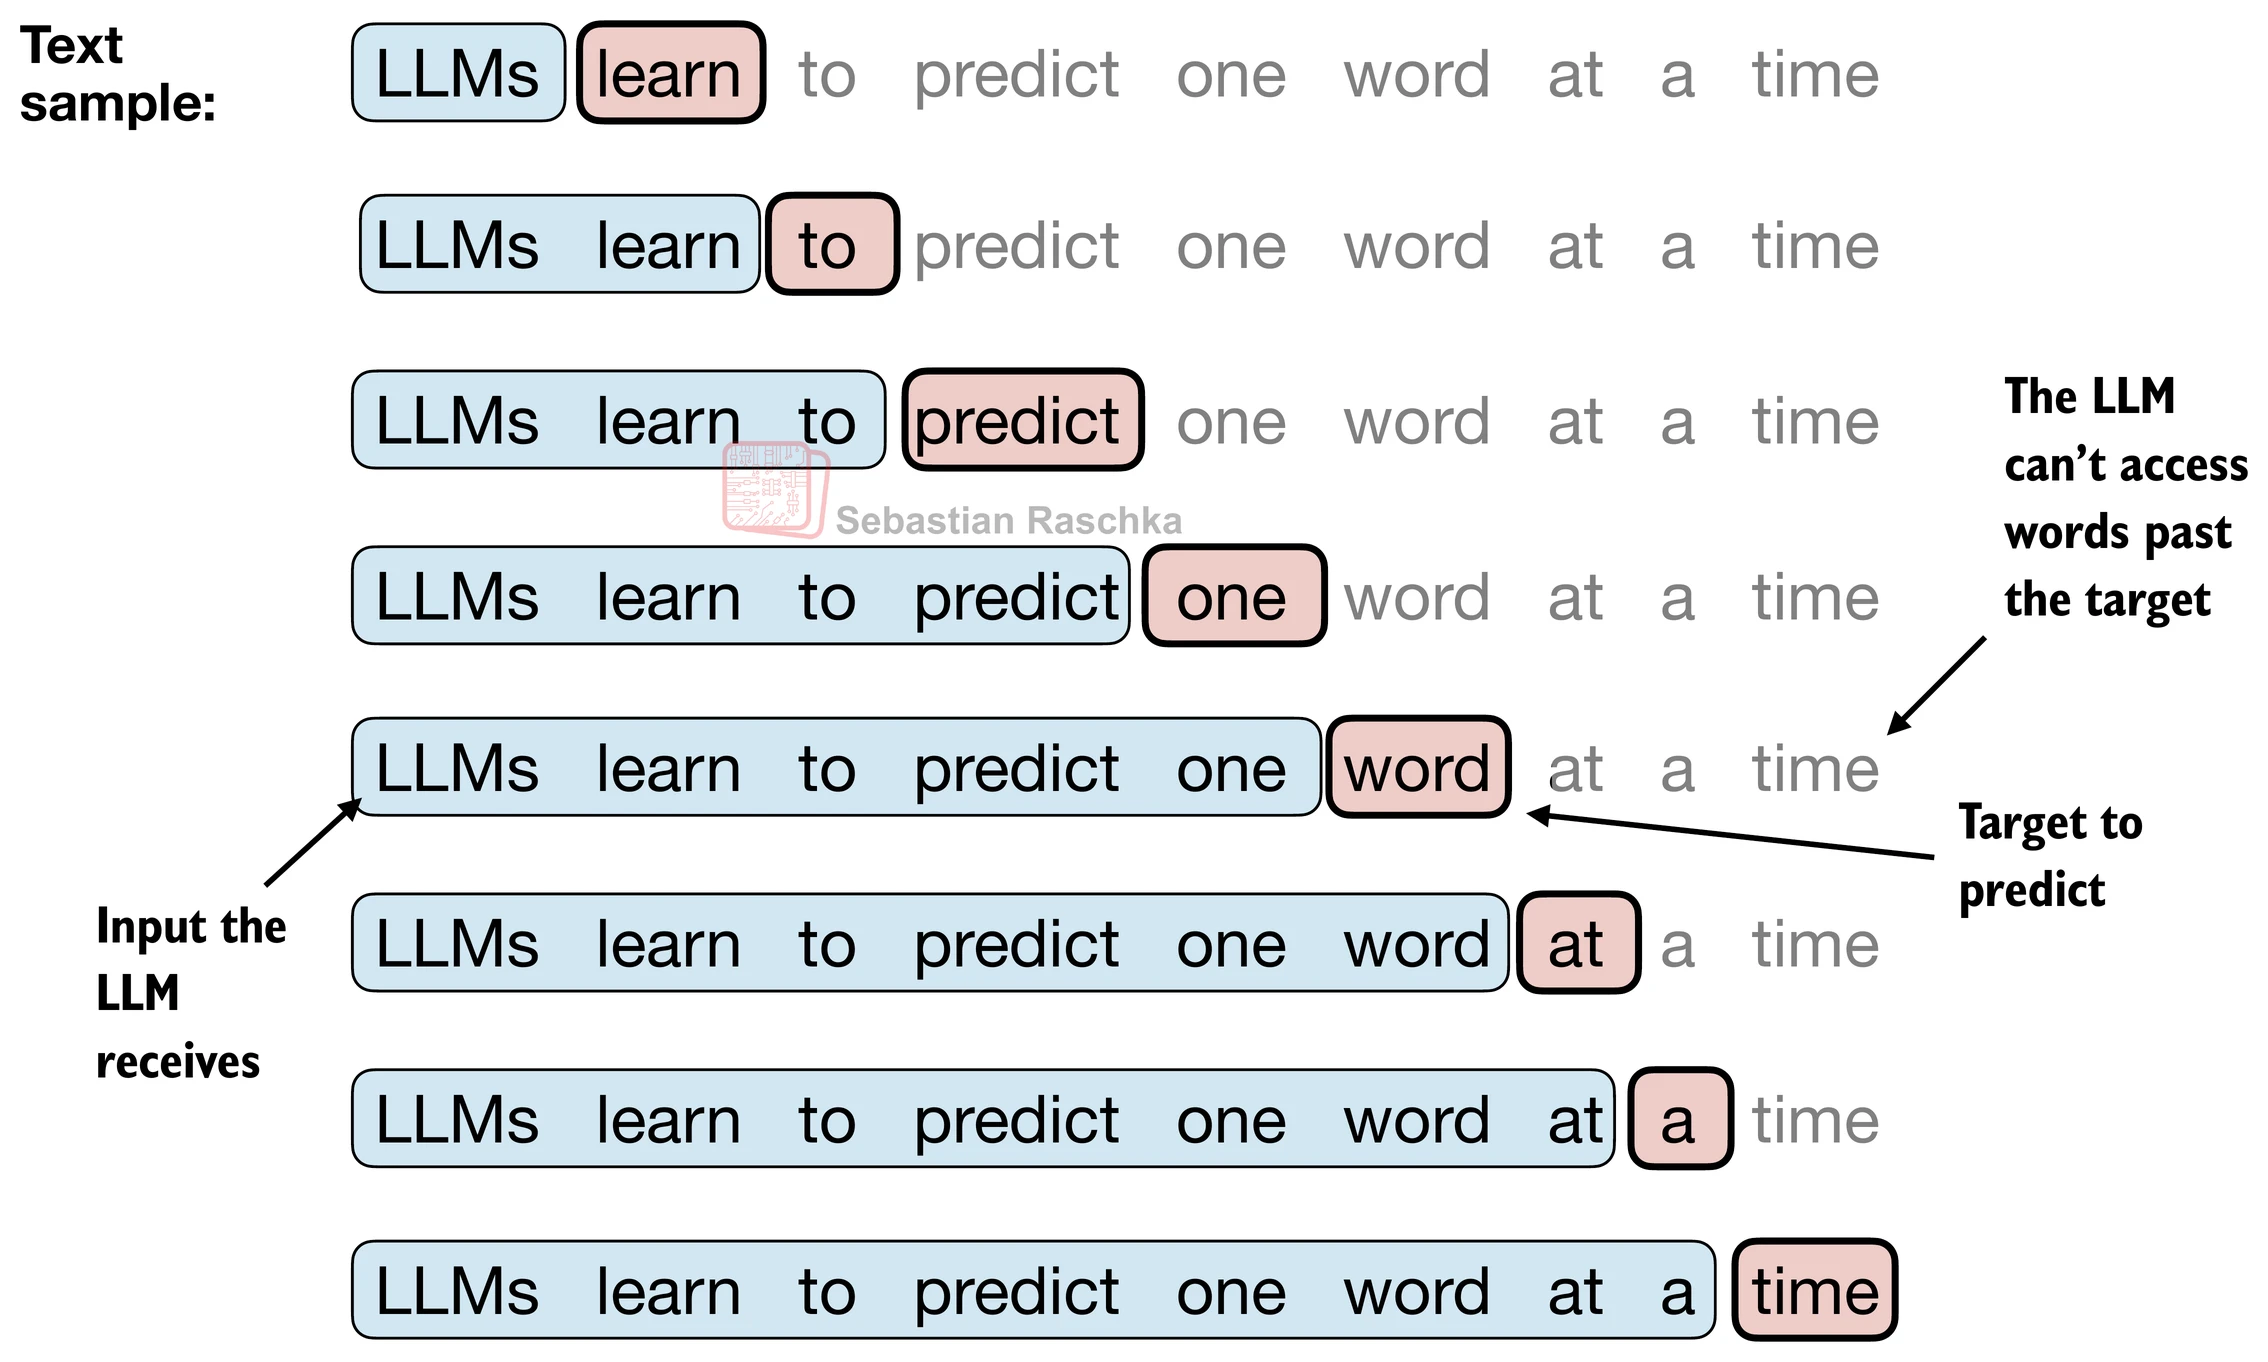
We train LLMs to generate one word at a time, so we want to prepare the training data accordingly where the next word in a sequence represents the target to predict:
# Tokenize the previous fetched txt

with open("the-verdict.txt", "r", encoding="utf-8") as f:
    raw_text = f.read()

enc_text = tokenizer.encode(raw_text)
print(len(enc_text))
5145
For each text chunk, we want the inputs and targets.
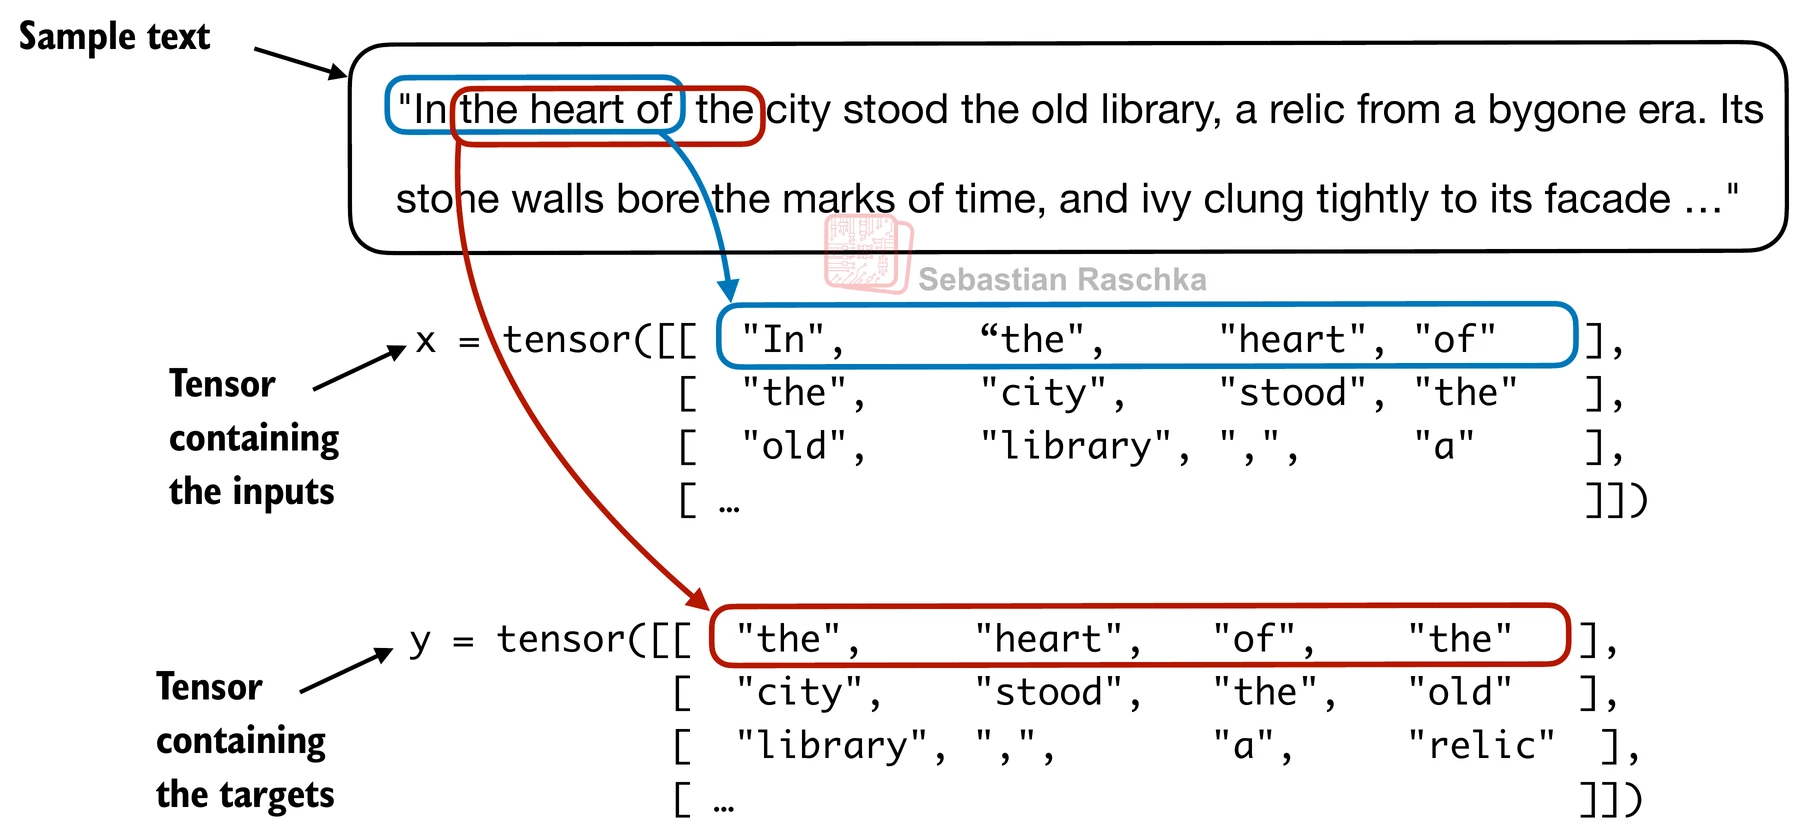
Since we want the model to predict the next word, the targets are the inputs shifted by one position to the right.
enc_sample = enc_text[50:]
context_size = 4

x = enc_sample[:context_size]
y = enc_sample[1:context_size+1]

print(f"x: {x}")
print(f"y:      {y}")
x: [290, 4920, 2241, 287]
y: [4920, 2241, 287, 257]
One by one, the prediction would look like as follows:
for i in range(1, context_size+1):
    context = enc_sample[:i]
    desired = enc_sample[i]

    print(context, "---->", desired)
[290] ----> 4920
[290, 4920] ----> 2241
[290, 4920, 2241] ----> 287
[290, 4920, 2241, 287] ----> 257
for i in range(1, context_size+1):
    context = enc_sample[:i]
    desired = enc_sample[i]

    print(tokenizer.decode(context), "---->", tokenizer.decode([desired]))
and ----> established
and established ----> himself
and established himself ----> in
and established himself in ----> a
For now, we implement a simple data loader that iterates over the input dataset and returns the inputs and targets shifted by one.
import torch
print("PyTorch version:", torch.__version__)
PyTorch version: 2.8.0+cu126
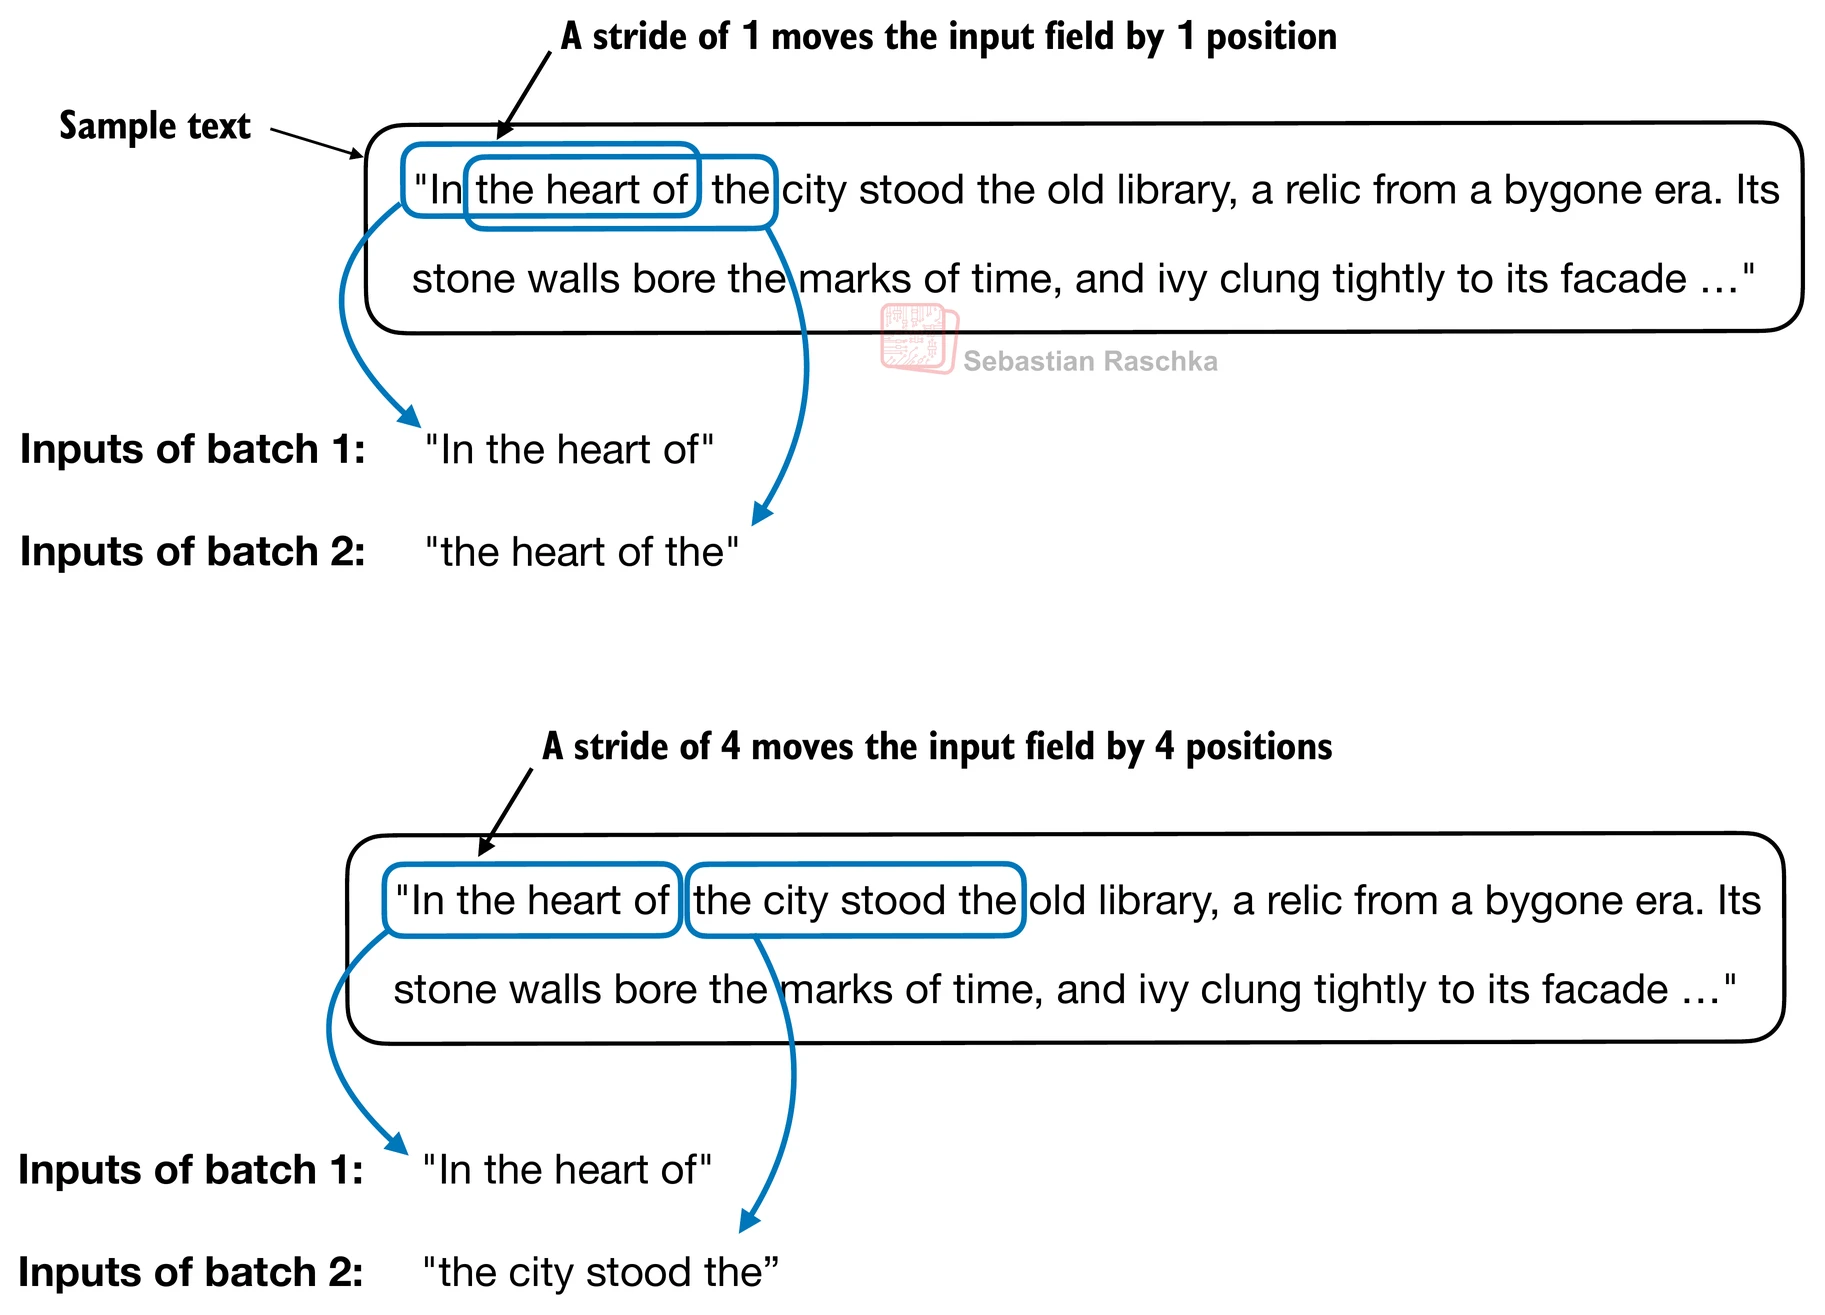
We use a sliding window approach, changing the position by +1:
Create dataset and dataloader that extract chunks from the input text dataset.
# Create a dataset for dataloader

from torch.utils.data import Dataset, DataLoader


class GPTDatasetV1(Dataset):
    def __init__(self, txt, tokenizer, max_length, stride):
        self.input_ids = []
        self.target_ids = []

        # Tokenize the entire text
        token_ids = tokenizer.encode(txt, allowed_special={"<|endoftext|>"})
        assert len(token_ids) > max_length, "Number of tokenized inputs must at least be equal to max_length+1"

        # Use a sliding window to chunk the book into overlapping sequences of max_length
        for i in range(0, len(token_ids) - max_length, stride):
            input_chunk = token_ids[i:i + max_length]
            target_chunk = token_ids[i + 1: i + max_length + 1]
            self.input_ids.append(torch.tensor(input_chunk))
            self.target_ids.append(torch.tensor(target_chunk))

    def __len__(self):
        return len(self.input_ids)

    def __getitem__(self, idx):
        return self.input_ids[idx], self.target_ids[idx]
# Create a dataloader
def create_dataloader_v1(txt, batch_size=4, max_length=256,
stride=128, shuffle=True, drop_last=True,
num_workers=0):
# Initialize the tokenizer
tokenizer = tiktoken.get_encoding("gpt2")
# Create dataset
dataset = GPTDatasetV1(txt, tokenizer, max_length, stride)
# Create dataloader
dataloader = DataLoader(
dataset,
batch_size=batch_size,
shuffle=shuffle,
drop_last=drop_last,
num_workers=num_workers
)
return dataloaderLet’s test the dataloader with a batch size of 1 for an LLM with a context size of 4:
# Get text and dataloader ready

with open("the-verdict.txt", "r", encoding="utf-8") as f:
    raw_text = f.read()

dataloader = create_dataloader_v1(
    raw_text, batch_size=1, max_length=4, stride=1, shuffle=False
)

data_iter = iter(dataloader)
first_batch = next(data_iter)
print(first_batch)[tensor([[ 40, 367, 2885, 1464]]), tensor([[ 367, 2885, 1464, 1807]])]
second_batch = next(data_iter)
print(second_batch)
[tensor([[ 367, 2885, 1464, 1807]]), tensor([[2885, 1464, 1807, 3619]])]
An example using stride equal to the context length (here: 4) as shown below:
We can also create batched outputs.
Note that we increase the stride here so that we don’t have overlaps between the batches, since more overlap could lead to increased overfitting.
dataloader = create_dataloader_v1(raw_text, batch_size=8, max_length=4, stride=4, shuffle=False)

data_iter = iter(dataloader)
inputs, targets = next(data_iter)
print("Inputs:\n", inputs)
print("\nTargets:\n", targets)
Inputs:
tensor([[ 40, 367, 2885, 1464],
[ 1807, 3619, 402, 271],
[10899, 2138, 257, 7026],
[15632, 438, 2016, 257],
[ 922, 5891, 1576, 438],
[ 568, 340, 373, 645],
[ 1049, 5975, 284, 502],
[ 284, 3285, 326, 11]])
Targets:
tensor([[ 367, 2885, 1464, 1807],
[ 3619, 402, 271, 10899],
[ 2138, 257, 7026, 15632],
[ 438, 2016, 257, 922],
[ 5891, 1576, 438, 568],
[ 340, 373, 645, 1049],
[ 5975, 284, 502, 284],
[ 3285, 326, 11, 287]])
Creating token embeddings
The data is already almost ready for an LLM.
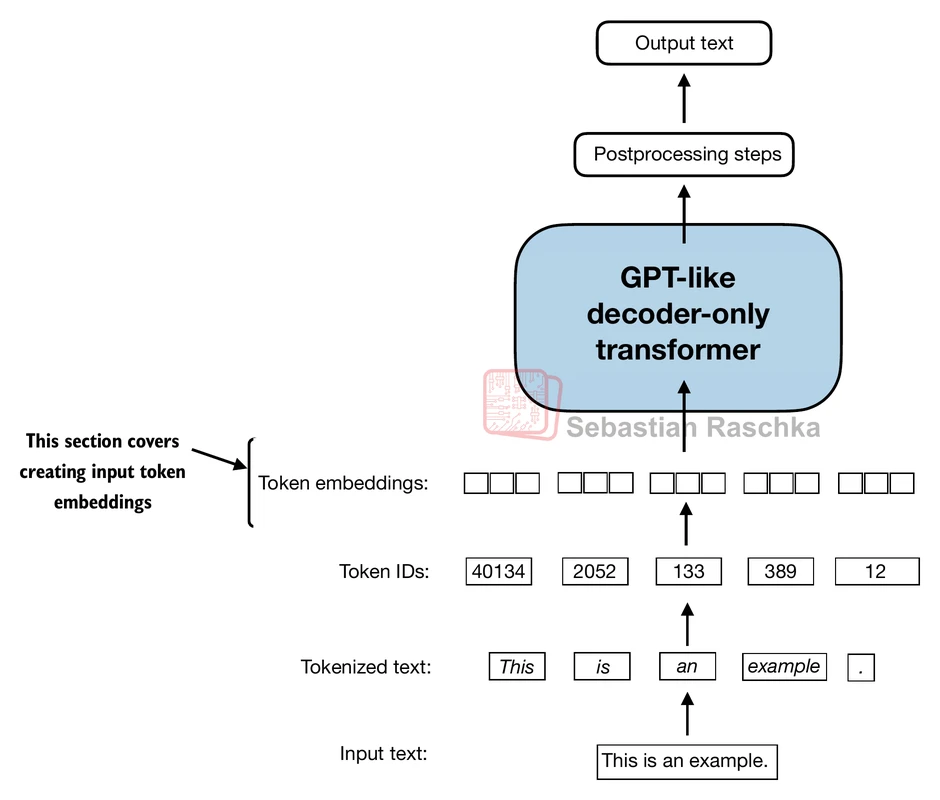
But lastly let us embed the tokens in a continuous vector representation using an embedding layer.
Usually, these embedding layers are part of the LLM itself and are updated (trained) during model training.
Suppose we have the following four input examples with input ids 2, 3, 5, and 1 (after tokenization):
input_ids = torch.tensor([2, 3, 5, 1])For the sake of simplicity, suppose we have a small vocabulary of only 6 words and we want to create embeddings of size 3:
vocab_size = 6
output_dim = 3

torch.manual_seed(123)
embedding_layer = torch.nn.Embedding(vocab_size, output_dim) # matmul in NN
This would result in a 6x3 weight matrix:
print(embedding_layer.weight)Parameter containing:
tensor([[ 0.3374, -0.1778, -0.1690],
[ 0.9178, 1.5810, 1.3010],
[ 1.2753, -0.2010, -0.1606],
[-0.4015, 0.9666, -1.1481],
[-1.1589, 0.3255, -0.6315],
[-2.8400, -0.7849, -1.4096]], requires_grad=True)
For those who are familiar with one-hot encoding, the embedding layer approach above is essentially just a more efficient way of implementing one-hot encoding followed by matrix multiplication in a fully-connected layer.
Because the embedding layer is just a more efficient implementation that is equivalent to the one-hot encoding and matrix-multiplication approach it can be seen as a neural network layer that can be optimized via backpropagation.
An embedding layer is essentially a look-up operation.
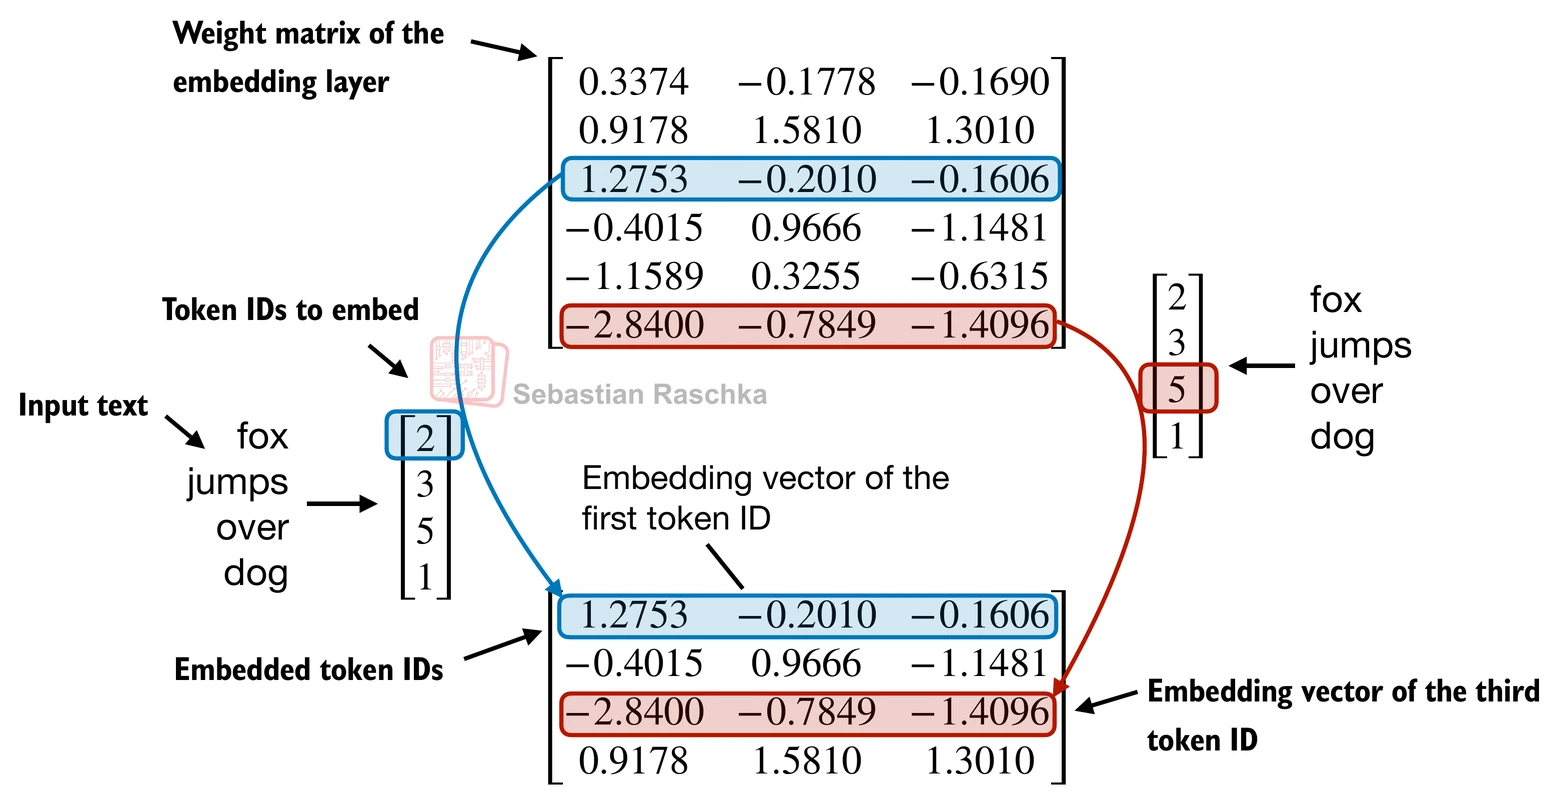
Then, to convert a token with id 3 into a 3-dimensional vector, we do the following:
# Print the 4th row in the `embedding_layer` weight matrix

print(embedding_layer(torch.tensor([3])))
tensor([[-0.4015, 0.9666, -1.1481]], grad_fn=<EmbeddingBackward0>)
To embed all four input_ids values above, we do:
print(embedding_layer(input_ids))tensor([[ 1.2753, -0.2010, -0.1606],
[-0.4015, 0.9666, -1.1481],
[-2.8400, -0.7849, -1.4096],
[ 0.9178, 1.5810, 1.3010]], grad_fn=<EmbeddingBackward0>)
Encoding word positions
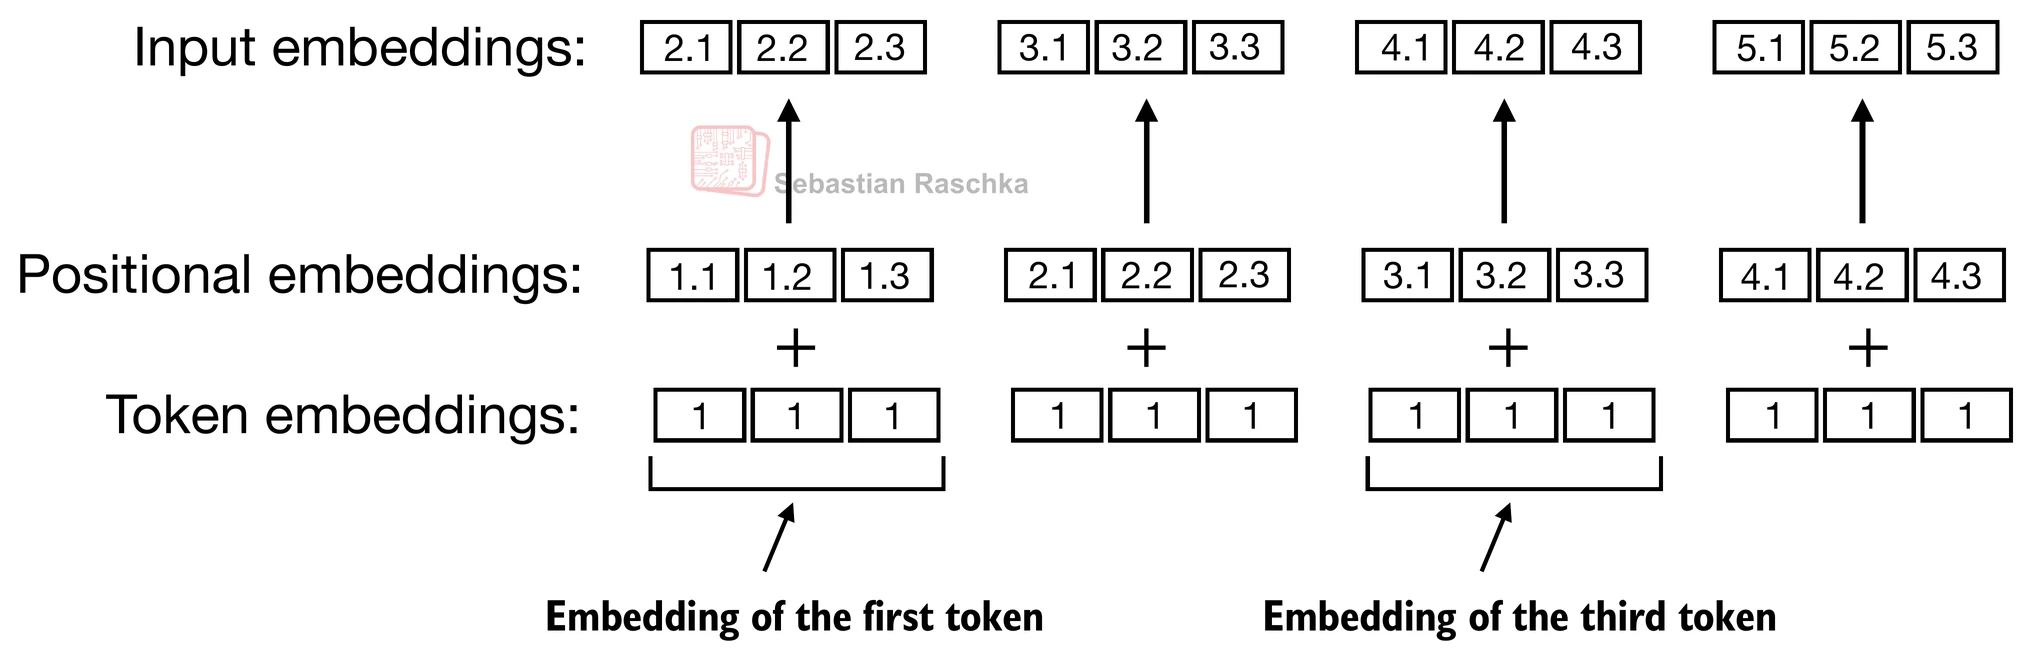
Embedding layer convert IDs into identical vector representations regardless of where they are located in the input sequence:
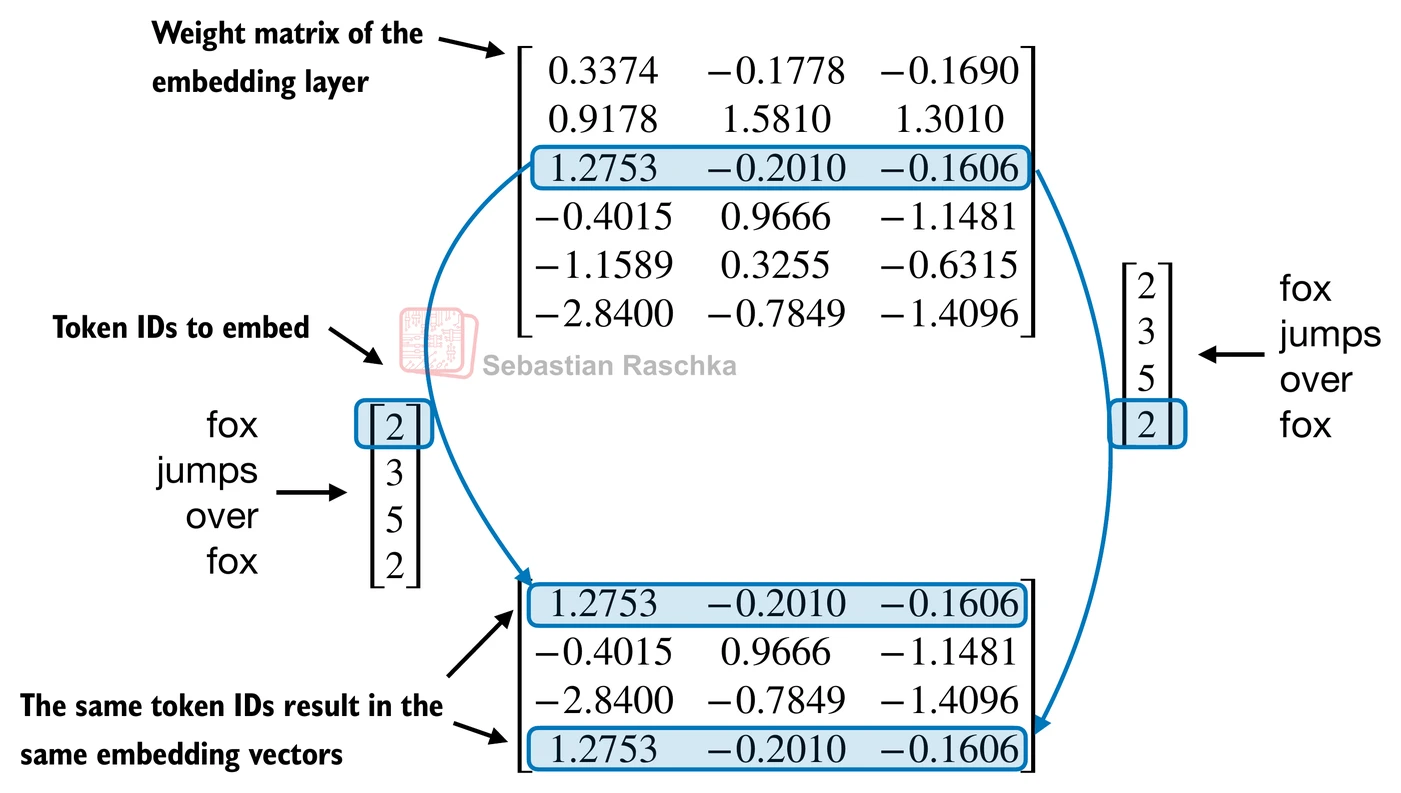
Positional embeddings are combined with the token embedding vector to form the input embeddings for a LLM:
The BytePair encoder has a vocabulary size of 50,257.
Suppose we want to encode the input tokens into a 256-dimensional vector representation:
vocab_size = 50257
output_dim = 256

token_embedding_layer = torch.nn.Embedding(vocab_size, output_dim)
If we sample data from the dataloader, we embed the tokens in each batch into a 256-dimensional vector.
If we have a batch size of 8 with 4 tokens each, this results in a 8 x 4 x 256 tensor:
max_length = 4
dataloader = create_dataloader_v1(
    raw_text, batch_size=8, max_length=max_length,
    stride=max_length, shuffle=False
)
data_iter = iter(dataloader)
inputs, targets = next(data_iter)
print("Token IDs:\n", inputs)
print("\nInputs shape:\n", inputs.shape)Token IDs:
tensor([[ 40, 367, 2885, 1464],
[ 1807, 3619, 402, 271],
[10899, 2138, 257, 7026],
[15632, 438, 2016, 257],
[ 922, 5891, 1576, 438],
[ 568, 340, 373, 645],
[ 1049, 5975, 284, 502],
[ 284, 3285, 326, 11]])
Inputs shape:
torch.Size([8, 4])
token_embeddings = token_embedding_layer(inputs)
print(token_embeddings.shape)
print(token_embeddings)
torch.Size([8, 4, 256])
tensor([[[ 0.4913, 1.1239, 1.4588, ..., -0.3995, -1.8735, -0.1445],
[ 0.4481, 0.2536, -0.2655, ..., 0.4997, -1.1991, -1.1844],
[-0.2507, -0.0546, 0.6687, ..., 0.9618, 2.3737, -0.0528],
[ 0.9457, 0.8657, 1.6191, ..., -0.4544, -0.7460, 0.3483]],
[[ 1.5460, 1.7368, -0.7848, ..., -0.1004, 0.8584, -0.3421],
[-1.8622, -0.1914, -0.3812, ..., 1.1220, -0.3496, 0.6091],
[ 1.9847, -0.6483, -0.1415, ..., -0.3841, -0.9355, 1.4478],
[ 0.9647, 1.2974, -1.6207, ..., 1.1463, 1.5797, 0.3969]],
[[-0.7713, 0.6572, 0.1663, ..., -0.8044, 0.0542, 0.7426],
[ 0.8046, 0.5047, 1.2922, ..., 1.4648, 0.4097, 0.3205],
[ 0.0795, -1.7636, 0.5750, ..., 2.1823, 1.8231, -0.3635],
[ 0.4267, -0.0647, 0.5686, ..., -0.5209, 1.3065, 0.8473]],
...,
[[-1.6156, 0.9610, -2.6437, ..., -0.9645, 1.0888, 1.6383],
[-0.3985, -0.9235, -1.3163, ..., -1.1582, -1.1314, 0.9747],
[ 0.6089, 0.5329, 0.1980, ..., -0.6333, -1.1023, 1.6292],
[ 0.3677, -0.1701, -1.3787, ..., 0.7048, 0.5028, -0.0573]],
[[-0.1279, 0.6154, 1.7173, ..., 0.3789, -0.4752, 1.5258],
[ 0.4861, -1.7105, 0.4416, ..., 0.1475, -1.8394, 1.8755],
[-0.9573, 0.7007, 1.3579, ..., 1.9378, -1.9052, -1.1816],
[ 0.2002, -0.7605, -1.5170, ..., -0.0305, -0.3656, -0.1398]],
[[-0.9573, 0.7007, 1.3579, ..., 1.9378, -1.9052, -1.1816],
[-0.0632, -0.6548, -1.0296, ..., -0.9538, -0.5026, -0.1128],
[ 0.6032, 0.8983, 2.0722, ..., 1.5242, 0.2030, -0.3002],
[ 1.1274, -0.1082, -0.2195, ..., 0.5059, -1.8138, -0.0700]]],
grad_fn=<EmbeddingBackward0>)
GPT-2 uses absolute position embeddings, so we just create another embedding layer:
context_length = max_length
pos_embedding_layer = torch.nn.Embedding(context_length, output_dim)

print(pos_embedding_layer.weight)
Parameter containing:
tensor([[ 1.7375, -0.5620, -0.6303, ..., -0.2277, 1.5748, 1.0345],
[ 1.6423, -0.7201, 0.2062, ..., 0.4118, 0.1498, -0.4628],
[-0.4651, -0.7757, 0.5806, ..., 1.4335, -0.4963, 0.8579],
[-0.6754, -0.4628, 1.4323, ..., 0.8139, -0.7088, 0.4827]],
requires_grad=True)
pos_embeddings = pos_embedding_layer(torch.arange(max_length))
print("Shape of position embeddings:")
print(pos_embeddings.shape)
print("\nAbsolute position embeddings:")
print(pos_embeddings)
Shape of position embeddings:
torch.Size([4, 256])
Absolute position embeddings:
tensor([[ 1.7375, -0.5620, -0.6303, ..., -0.2277, 1.5748, 1.0345],
[ 1.6423, -0.7201, 0.2062, ..., 0.4118, 0.1498, -0.4628],
[-0.4651, -0.7757, 0.5806, ..., 1.4335, -0.4963, 0.8579],
[-0.6754, -0.4628, 1.4323, ..., 0.8139, -0.7088, 0.4827]],
grad_fn=<EmbeddingBackward0>)
To create the input embeddings used in an LLM, we simply add the token and the positional embeddings:
input_embeddings = token_embeddings + pos_embeddings
print(input_embeddings.shape)
print(input_embeddings)
torch.Size([8, 4, 256])
tensor([[[ 2.2288, 0.5619, 0.8286, ..., -0.6272, -0.2987, 0.8900],
[ 2.0903, -0.4664, -0.0593, ..., 0.9115, -1.0493, -1.6473],
[-0.7158, -0.8304, 1.2494, ..., 2.3952, 1.8773, 0.8051],
[ 0.2703, 0.4029, 3.0514, ..., 0.3595, -1.4548, 0.8310]],
[[ 3.2835, 1.1749, -1.4150, ..., -0.3281, 2.4332, 0.6924],
[-0.2199, -0.9114, -0.1750, ..., 1.5337, -0.1998, 0.1462],
[ 1.5197, -1.4240, 0.4391, ..., 1.0494, -1.4318, 2.3057],
[ 0.2893, 0.8346, -0.1884, ..., 1.9602, 0.8709, 0.8796]],
[[ 0.9662, 0.0952, -0.4640, ..., -1.0320, 1.6290, 1.7771],
[ 2.4468, -0.2154, 1.4984, ..., 1.8766, 0.5595, -0.1423],
[-0.3856, -2.5393, 1.1556, ..., 3.6157, 1.3267, 0.4944],
[-0.2487, -0.5275, 2.0009, ..., 0.2930, 0.5977, 1.3300]],
...,
[[ 0.1219, 0.3991, -3.2740, ..., -1.1921, 2.6637, 2.6728],
[ 1.2438, -1.6436, -1.1101, ..., -0.7464, -0.9816, 0.5118],
[ 0.1439, -0.2428, 0.7786, ..., 0.8001, -1.5986, 2.4871],
[-0.3077, -0.6329, 0.0536, ..., 1.5188, -0.2060, 0.4254]],
[[ 1.6095, 0.0535, 1.0871, ..., 0.1512, 1.0996, 2.5603],
[ 2.1284, -2.4306, 0.6478, ..., 0.5593, -1.6896, 1.4126],
[-1.4224, -0.0750, 1.9386, ..., 3.3712, -2.4016, -0.3237],
[-0.4752, -1.2234, -0.0847, ..., 0.7834, -1.0744, 0.3429]],
[[ 0.7802, 0.1387, 0.7277, ..., 1.7101, -0.3304, -0.1471],
[ 1.5791, -1.3749, -0.8234, ..., -0.5420, -0.3528, -0.5756],
[ 0.1382, 0.1226, 2.6528, ..., 2.9576, -0.2933, 0.5577],
[ 0.4520, -0.5711, 1.2128, ..., 1.3198, -2.5226, 0.4127]]],
grad_fn=<AddBackward0>)
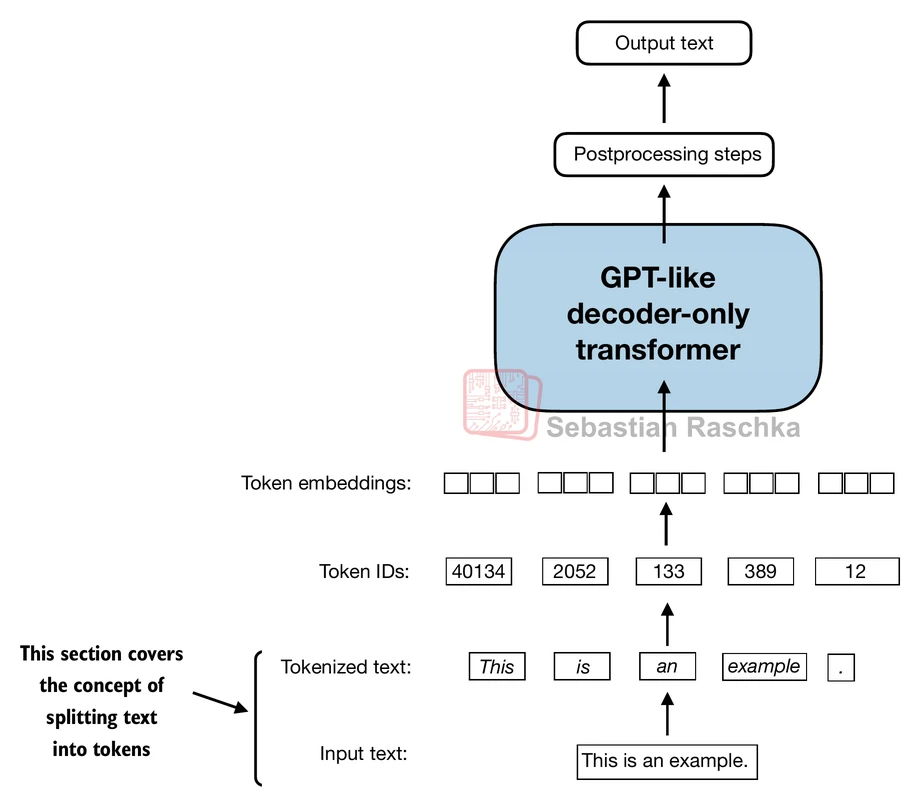
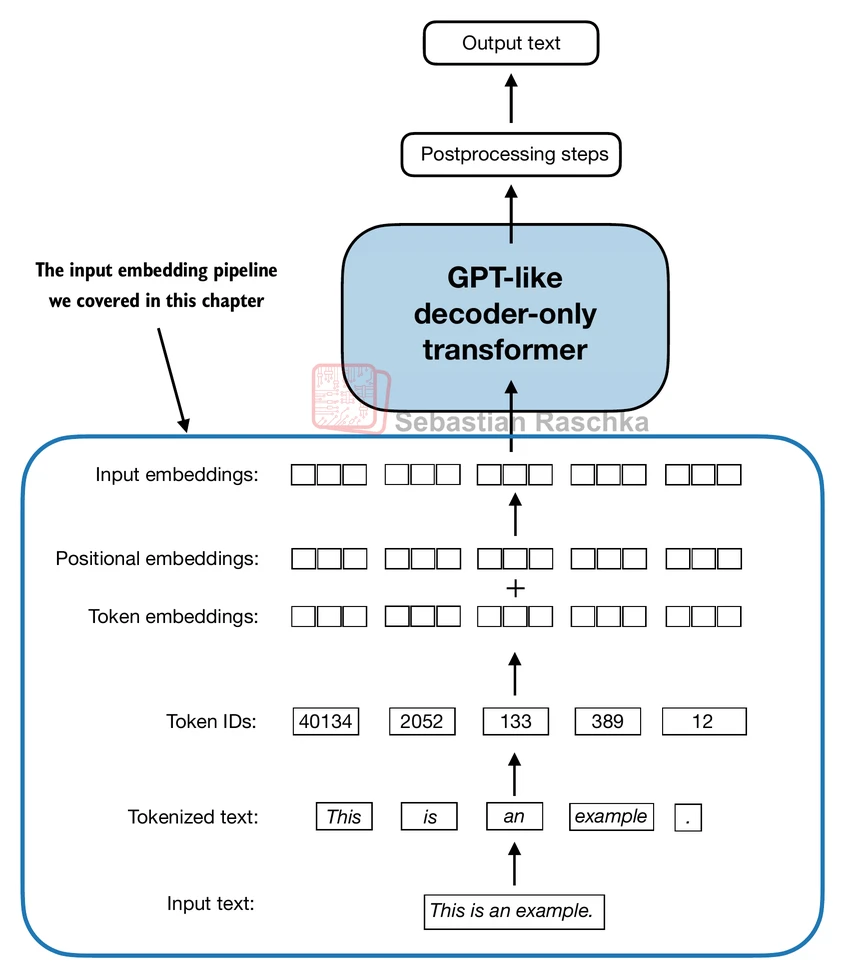
In the initial phase of the input processing workflow, the input text is segmented into separate tokens.
Following this segmentation, these tokens are transformed into token IDs based on a predefined vocabulary.
Prepare for interview
TBC, it will be created soon.