Creator: Chung-En Johnny Yu
Content updated: 2025-10-18
Source:
Build a Large Language Model From Scratch by Sebastian Raschka - Ch4
Hands-on practice this notebook on your Google Colab:
Now, run the code and practice it!
Additional resources:
KV cache to speed up the text generation during inference by Sebastian Raschka
Mixture-of-Experts (MoE) by Sebastian Raschka
GPT to Llama 3.2 by Sebastian Raschka
The Transformer Family Version 2.0 by Lilian Weng
Understanding and Coding the KV Cache in LLMs from Scratch by Sebastian Raschka
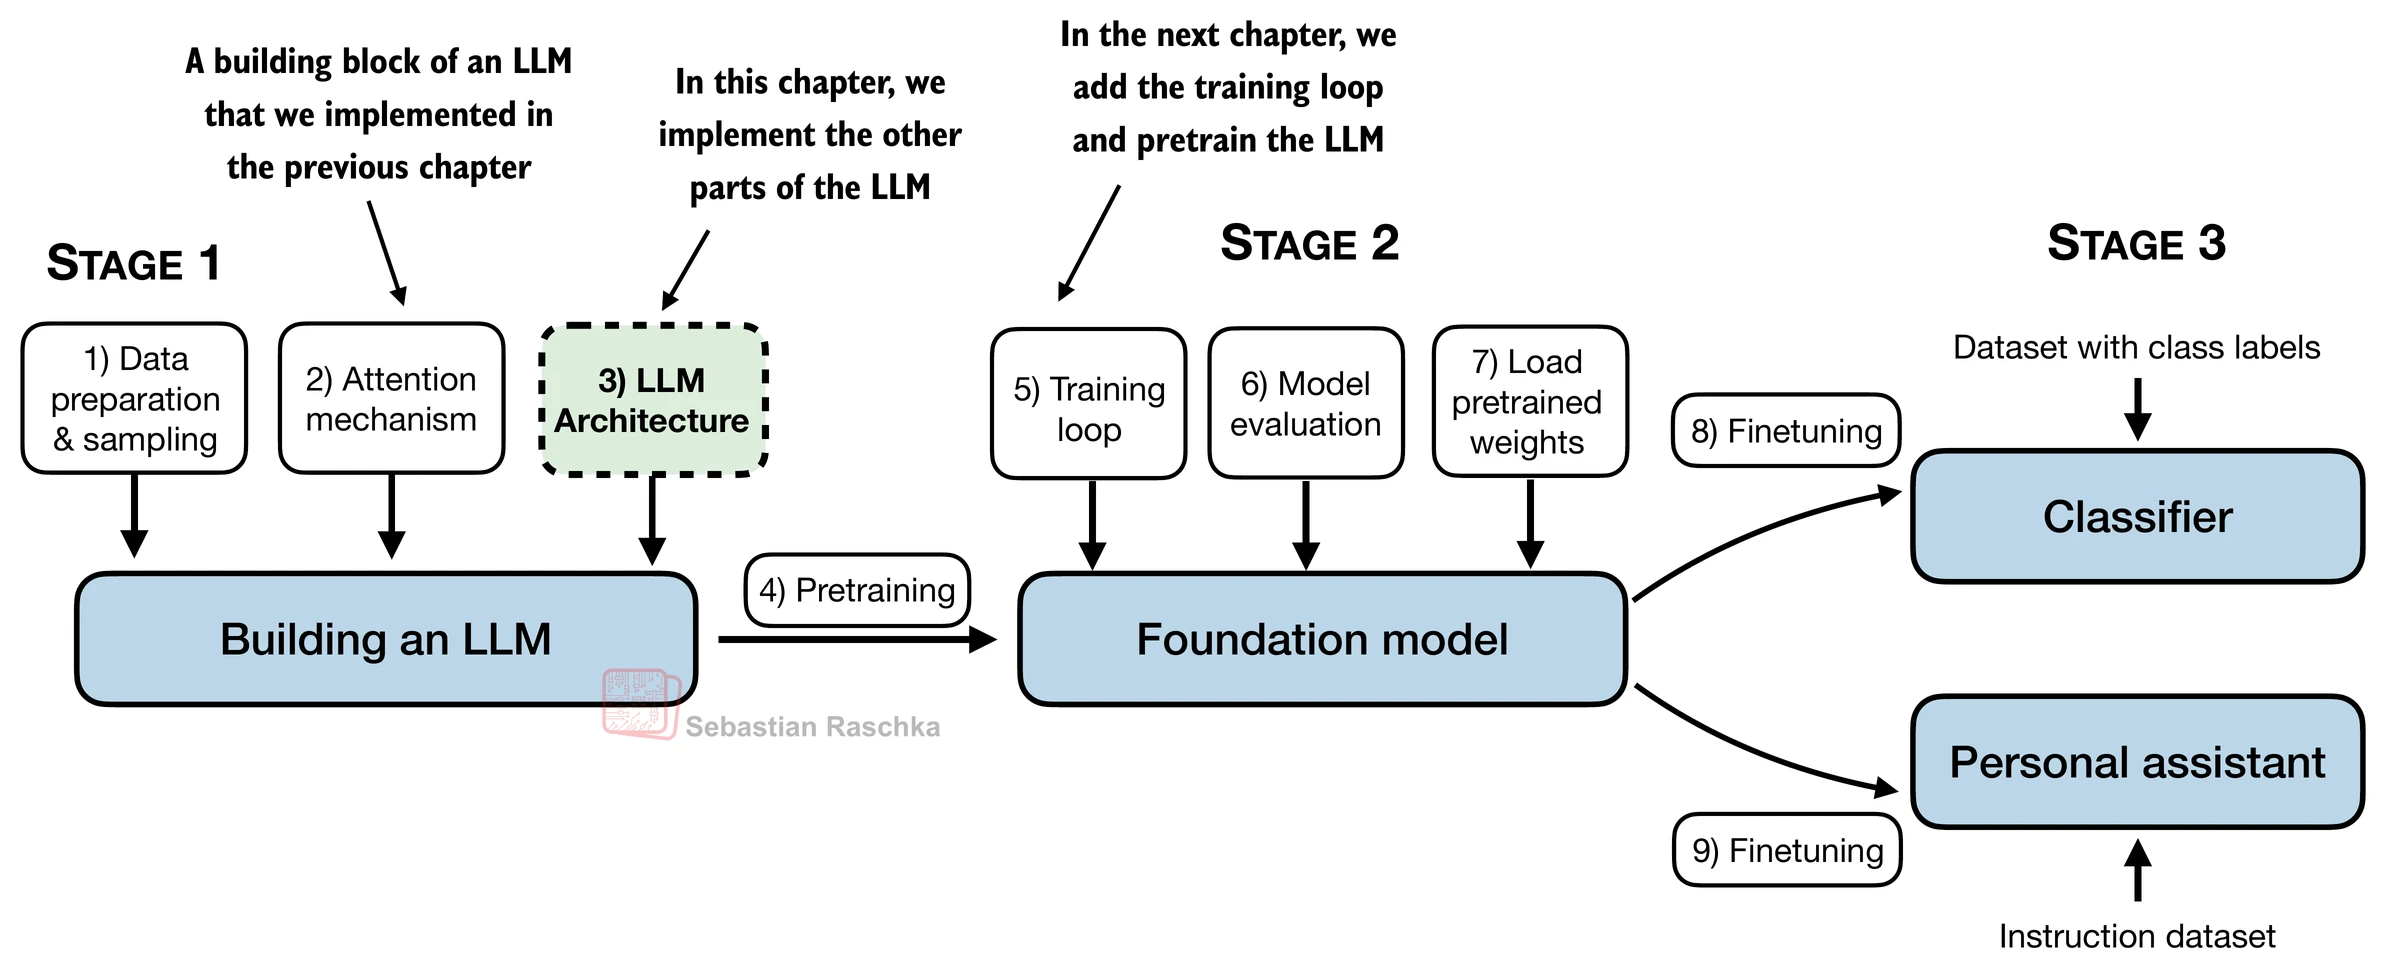
A general LLM architecture
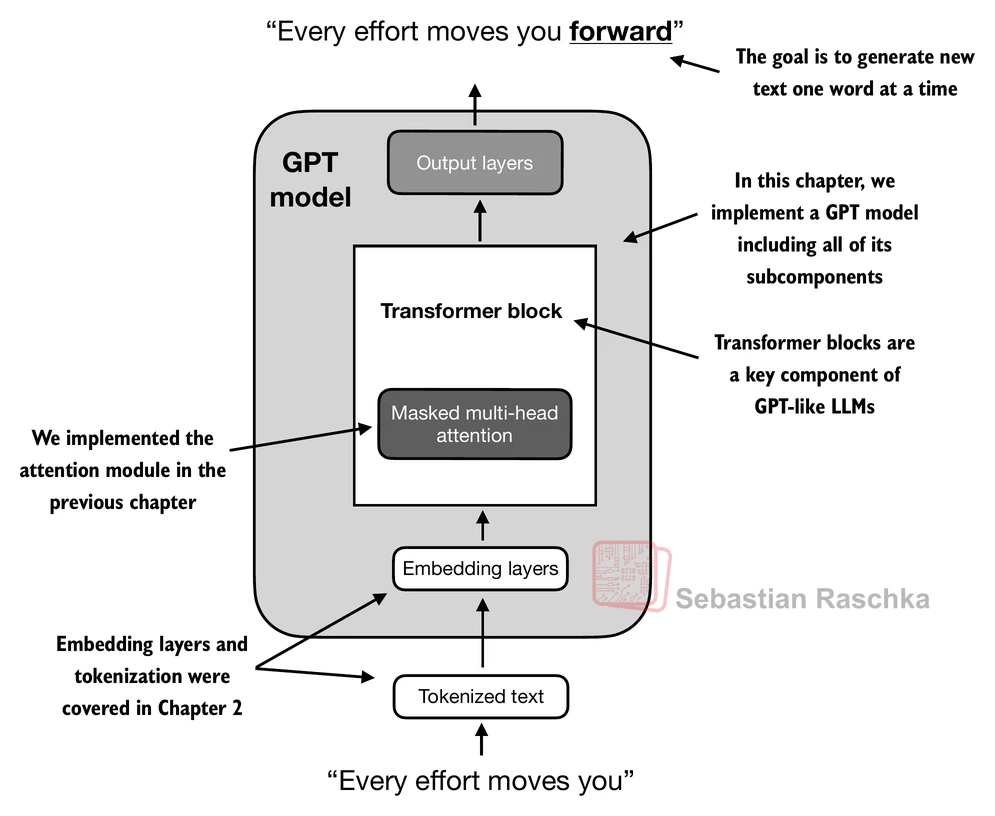
Here, we consider embedding and model sizes akin to a small GPT-2 model (124 million parameters).
from importlib.metadata import version

print("matplotlib version:", version("matplotlib"))
print("torch version:", version("torch"))
print("tiktoken version:", version("tiktoken"))
matplotlib version: 3.10.0
torch version: 2.8.0+cu126
tiktoken version: 0.12.0
GPT_CONFIG_124M = {
    "vocab_size": 50257,    # Vocabulary size
    "context_length": 1024, # Context length
    "emb_dim": 768,         # Embedding dimension
    "n_heads": 12,          # Number of attention heads
    "n_layers": 12,         # Number of layers
    "drop_rate": 0.1,       # Dropout rate
    "qkv_bias": False       # Query-Key-Value bias
}
We use short variable names to avoid long lines of code later
"vocab_size"indicates a vocabulary size of 50,257 words, supported by the BPE tokenizer."context_length"represents the model’s maximum input token count, as enabled by positional embeddings."emb_dim"is the embedding size for token inputs, converting each input token into a 768-dimensional vector."n_heads"is the number of attention heads in the multi-head attention mechanism."n_layers"is the number of transformer blocks within the model."drop_rate"is the dropout mechanism’s intensity; 0.1 means dropping 10% of hidden units during training to mitigate overfitting."qkv_bias"decides if theLinearlayers in the multi-head attention mechanism should include a bias vector when computing query (Q), key (K), and value (V) tensors; we’ll disable this option, which is standard practice in modern LLMs.
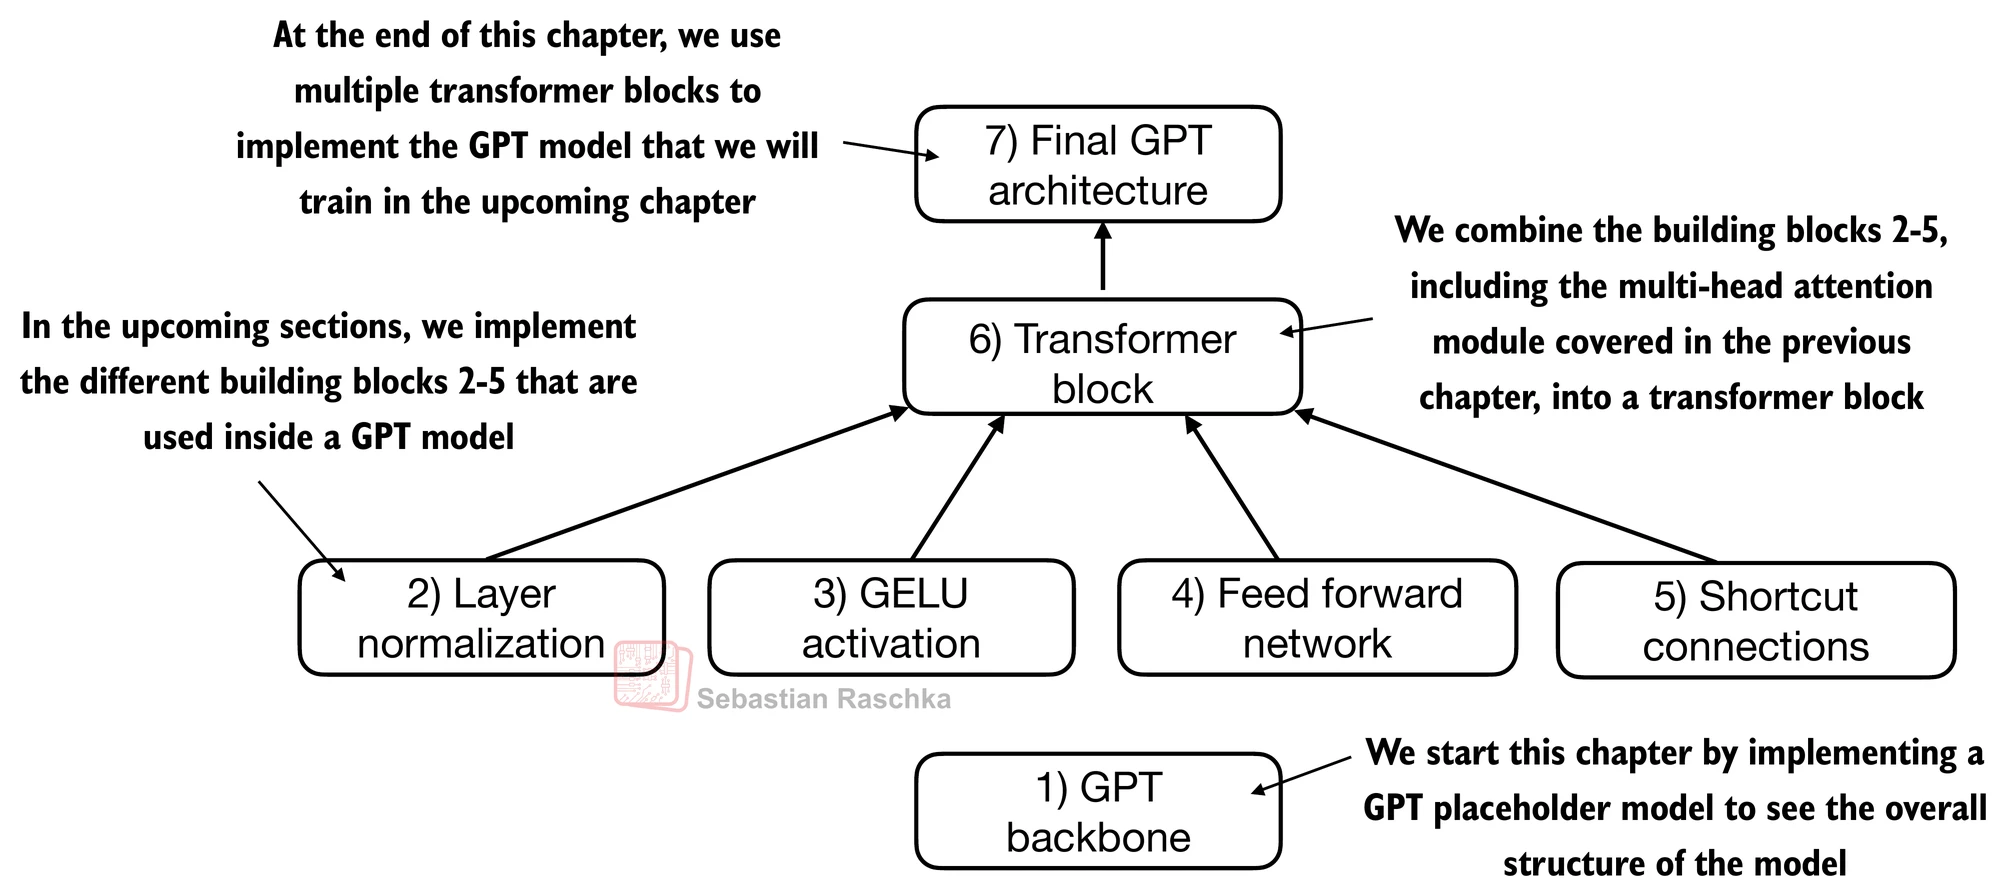
# 1) GPT backbone

import torch
import torch.nn as nn


class DummyGPTModel(nn.Module):
    def __init__(self, cfg):
        super().__init__()
        self.tok_emb = nn.Embedding(cfg["vocab_size"], cfg["emb_dim"])
        self.pos_emb = nn.Embedding(cfg["context_length"], cfg["emb_dim"])
        self.drop_emb = nn.Dropout(cfg["drop_rate"])

        # Use a placeholder for TransformerBlock
        self.trf_blocks = nn.Sequential(
            *[DummyTransformerBlock(cfg) for _ in range(cfg["n_layers"])])

        # Use a placeholder for LayerNorm
        self.final_norm = DummyLayerNorm(cfg["emb_dim"])
        self.out_head = nn.Linear(
            cfg["emb_dim"], cfg["vocab_size"], bias=False
        )

    def forward(self, in_idx):
        batch_size, seq_len = in_idx.shape
        tok_embeds = self.tok_emb(in_idx)
        pos_embeds = self.pos_emb(torch.arange(seq_len, device=in_idx.device))
        x = tok_embeds + pos_embeds
        x = self.drop_emb(x)
        x = self.trf_blocks(x)
        x = self.final_norm(x)
        logits = self.out_head(x)
        return logits


class DummyTransformerBlock(nn.Module):
    def __init__(self, cfg):
        super().__init__()
        # A simple placeholder

    def forward(self, x):
        # This block does nothing and just returns its input.
        return x


class DummyLayerNorm(nn.Module):
    def __init__(self, normalized_shape, eps=1e-5):
        super().__init__()
        # The parameters here are just to mimic the LayerNorm interface.

    def forward(self, x):
        # This layer does nothing and just returns its input.
        return x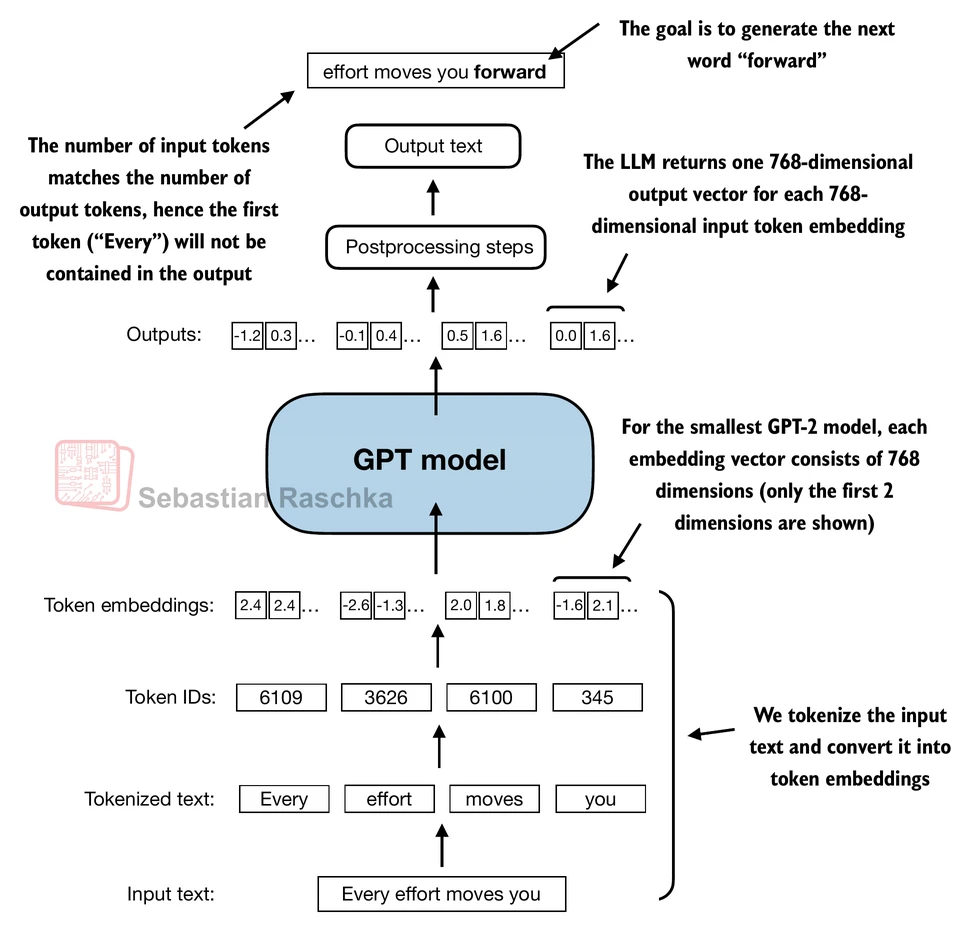
import tiktoken

tokenizer = tiktoken.get_encoding("gpt2")

batch = []

txt1 = "Every effort moves you"
txt2 = "Every day holds a"

# Tokenize input texts
batch.append(torch.tensor(tokenizer.encode(txt1)))
batch.append(torch.tensor(tokenizer.encode(txt2)))
batch = torch.stack(batch, dim=0)

# 1st row is txt1's token IDs
print(batch)
tensor([[6109, 3626, 6100, 345],
[6109, 1110, 6622, 257]])
We now use DummyGPTModel to tokenize the batch texts (dim 2x4) into the embeddings. The embedding now has 50,257 dimensions because each of these dimensions refers to a unique token in the vocabulary.
torch.manual_seed(123)
model = DummyGPTModel(GPT_CONFIG_124M)
logits = model(batch)
print("Output shape:", logits.shape)
print(logits)Output shape: torch.Size([2, 4, 50257])
tensor([[[-1.2034, 0.3201, -0.7130, ..., -1.5548, -0.2390, -0.4667],
[-0.1192, 0.4539, -0.4432, ..., 0.2392, 1.3469, 1.2430],
[ 0.5307, 1.6720, -0.4695, ..., 1.1966, 0.0111, 0.5835],
[ 0.0139, 1.6755, -0.3388, ..., 1.1586, -0.0435, -1.0400]],
[[-1.0908, 0.1798, -0.9484, ..., -1.6047, 0.2439, -0.4530],
[-0.7860, 0.5581, -0.0610, ..., 0.4835, -0.0077, 1.6621],
[ 0.3567, 1.2698, -0.6398, ..., -0.0162, -0.1296, 0.3717],
[-0.2407, -0.7349, -0.5102, ..., 2.0057, -0.3694, 0.1814]]],
grad_fn=<UnsafeViewBackward0>)
Layer normalization
Layer normalization, also known as LayerNorm (Ba et al. 2016), centers the activations of a neural network layer around a mean of 0 and normalizes their variance to 1.
It stabilizes training and enables faster convergence to effective weights.
Layer normalization is applied both before and after the multi-head attention module within the transformer block; it’s also applied before the final output layer.
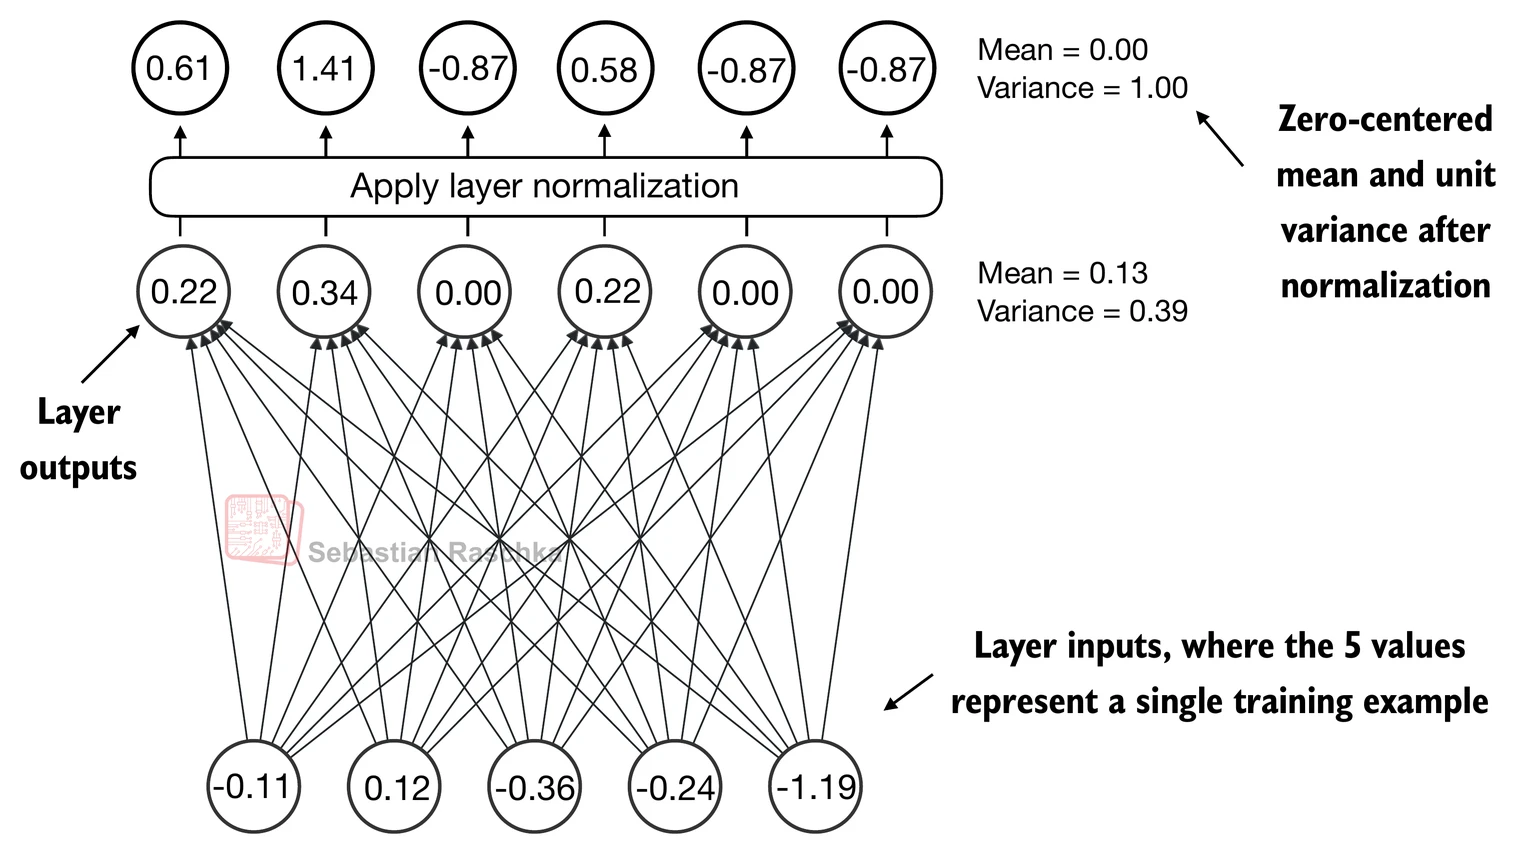
Let’s see how layer normalization works by passing a small input sample through a simple neural network layer:
torch.manual_seed(123)
# create 2 training examples with 5 dimensions (features) each
batch_example = torch.randn(2, 5)
layer = nn.Sequential(nn.Linear(5, 6), nn.ReLU())
out = layer(batch_example)
print(out)tensor([[0.2260, 0.3470, 0.0000, 0.2216, 0.0000, 0.0000],
[0.2133, 0.2394, 0.0000, 0.5198, 0.3297, 0.0000]],
grad_fn=<ReluBackward0>)
Let’s compute the mean and variance for each of the 2 inputs above:
mean = out.mean(dim=-1, keepdim=True)
var = out.var(dim=-1, keepdim=True)
print("Mean:\n", mean)
print("Variance:\n", var)Mean:
tensor([[0.1324],
[0.2170]], grad_fn=<MeanBackward1>)
Variance:
tensor([[0.0231],
[0.0398]], grad_fn=<VarBackward0>)
The normalization is applied to each of the two inputs (rows) independently; using dim=-1 applies the calculation across the last dimension (in this case, the feature dimension) instead of the row dimension.
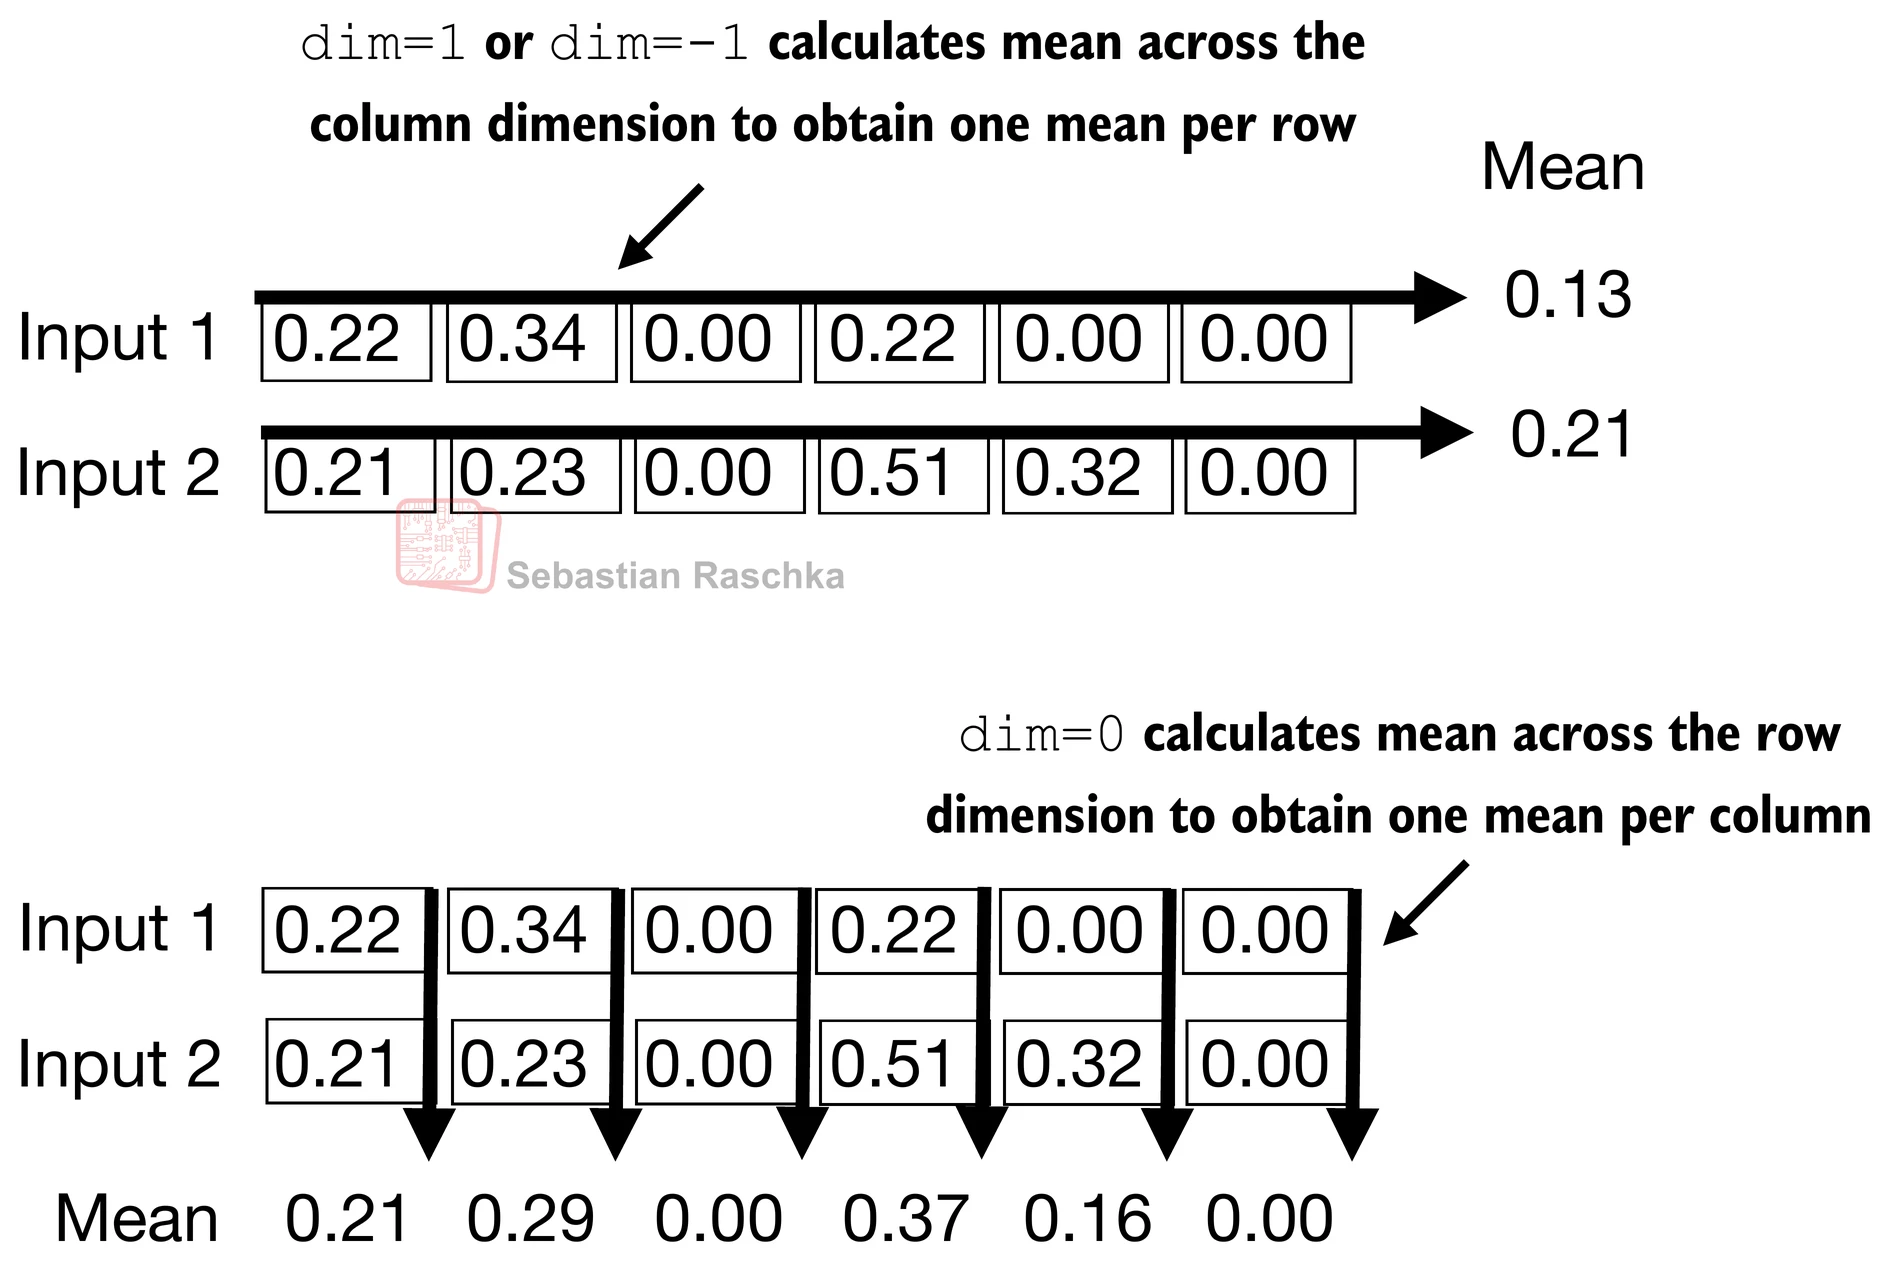
Subtracting the mean and dividing by the square-root of the variance (standard deviation) centers the inputs to have a mean of 0 and a variance of 1 across the column (feature) dimension:
out_norm = (out - mean) / torch.sqrt(var)
print("Normalized layer outputs:\n", out_norm)
mean = out_norm.mean(dim=-1, keepdim=True)
var = out_norm.var(dim=-1, keepdim=True)
print("Mean:\n", mean) # should be close to 0
print("Variance:\n", var) # should be close to 1Normalized layer outputs:
tensor([[ 0.6159, 1.4126, -0.8719, 0.5872, -0.8719, -0.8719],
[-0.0189, 0.1121, -1.0876, 1.5173, 0.5647, -1.0876]],
grad_fn=<DivBackward0>)
Mean:
tensor([[9.9341e-09],
[1.9868e-08]], grad_fn=<MeanBackward1>)
Variance:
tensor([[1.0000],
[1.0000]], grad_fn=<VarBackward0>)
Above, we normalized the features of each input.
Now, using the same idea, we can implement a LayerNorm class:
# 2) Layer normalization
class LayerNorm(nn.Module):
def __init__(self, emb_dim):
super().__init__()
self.eps = 1e-5
self.scale = nn.Parameter(torch.ones(emb_dim))
self.shift = nn.Parameter(torch.zeros(emb_dim))
def forward(self, x):
mean = x.mean(dim=-1, keepdim=True)
var = x.var(dim=-1, keepdim=True, unbiased=False)
norm_x = (x - mean) / torch.sqrt(var + self.eps)
return self.scale * norm_x + self.shiftScale and shift
Note that in addition to performing the normalization by subtracting the mean and dividing by the variance, we added two trainable parameters, a
scaleand ashiftparameter.Note that we also add a smaller value (
eps) before computing the square root of the variance; this is to avoid division-by-zero errors if the variance is 0.
Biased variance
Setting
unbiased=Falsemeans using the formula to compute the variance where is the sample size (here, the number of features or columns); this formula does not include Bessel’s correction (which usesn-1in the denominator), thus providing a biased estimate of the variance.For LLMs, where the embedding dimension
nis very large, the difference between using n andn-1is negligible.However, GPT-2 was trained with a biased variance in the normalization layers, which is why we also adopted this setting for compatibility reasons with the pretrained weights that we will load in later chapters.
Let’s now try out LayerNorm in practice:
ln = LayerNorm(emb_dim=5)
out_ln = ln(batch_example)mean = out_ln.mean(dim=-1, keepdim=True)
var = out_ln.var(dim=-1, unbiased=False, keepdim=True)
print("Mean:\n", mean)
print("Variance:\n", var)Mean:
tensor([[-2.9802e-08],
[ 0.0000e+00]], grad_fn=<MeanBackward1>)
Variance:
tensor([[1.0000],
[1.0000]], grad_fn=<VarBackward0>)
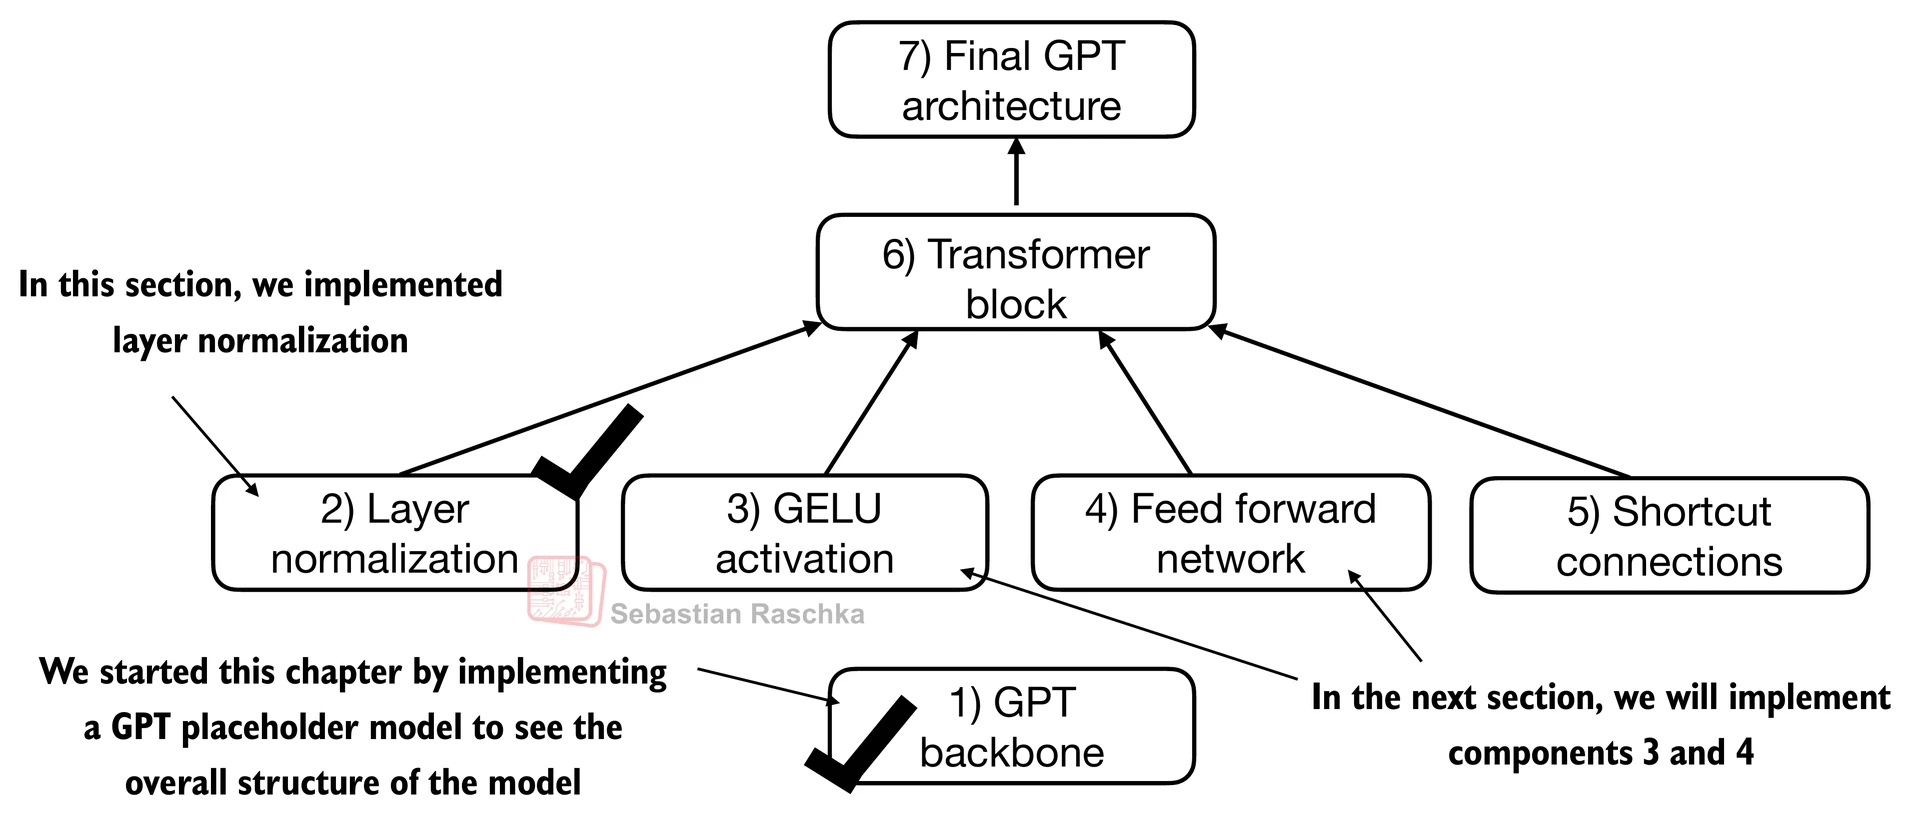
Feed forward network (FFN) with GELU activations
In this section, we implement a small neural network submodule that is used as part of the transformer block in LLMs.
Activation functions: ReLu vs. GELU vs. SwiGLU:
In deep learning, ReLU (Rectified Linear Unit) activation functions are commonly used due to their simplicity and effectiveness in various neural network architectures.
In LLMs, various other types of activation functions are used beyond the traditional ReLU; two notable examples are GELU (Gaussian Error Linear Unit) and SwiGLU (Swish-Gated Linear Unit).
GELU and SwiGLU are more complex, smooth activation functions incorporating Gaussian and sigmoid-gated linear units, respectively, offering better performance and introducing non-linearity for deep learning models, unlike the simpler, piecewise linear function of ReLU.
Additional:
In practice, GELU (Hendrycks and Gimpel 2016) is common to implement a computationally cheaper approximation:
(The original GPT-2 model was also trained with this approximation.)
# 3) GELU activation
class GELU(nn.Module):
def __init__(self):
super().__init__()
def forward(self, x):
return 0.5 * x * (1 + torch.tanh(
torch.sqrt(torch.tensor(2.0 / torch.pi)) *
(x + 0.044715 * torch.pow(x, 3))
))import matplotlib.pyplot as plt
gelu, relu = GELU(), nn.ReLU()
# Some sample data
x = torch.linspace(-3, 3, 100)
y_gelu, y_relu = gelu(x), relu(x)
plt.figure(figsize=(8, 3))
for i, (y, label) in enumerate(zip([y_gelu, y_relu], ["GELU", "ReLU"]), 1):
plt.subplot(1, 2, i)
plt.plot(x, y)
plt.title(f"{label} activation function")
plt.xlabel("x")
plt.ylabel(f"{label}(x)")
plt.grid(True)
plt.tight_layout()
plt.show()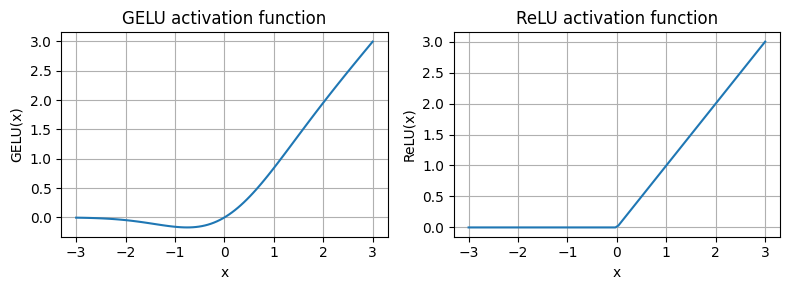
As we can see,
ReLU is a piecewise linear function that outputs the input directly if it is positive; otherwise, it outputs zero.
GELU is a smooth, non-linear function that approximates ReLU but with a non-zero gradient for negative values (except at approximately -0.75).
Next, let’s implement the small neural network module, FeedForward, that we will be using in the LLM’s transformer block later.
# 4) Feed forward network (FFN)
class FeedForward(nn.Module):
def __init__(self, cfg):
super().__init__()
self.layers = nn.Sequential(
nn.Linear(cfg["emb_dim"], 4 * cfg["emb_dim"]),
GELU(),
nn.Linear(4 * cfg["emb_dim"], cfg["emb_dim"]),
)
def forward(self, x):
return self.layers(x)print(GPT_CONFIG_124M["emb_dim"])768
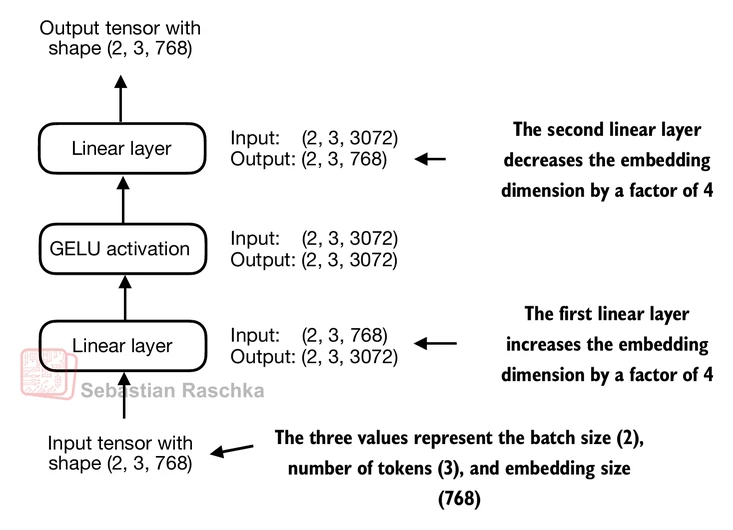
ffn = FeedForward(GPT_CONFIG_124M)
# input shape: [batch_size, num_token, emb_size]
x = torch.rand(2, 3, 768)
out = ffn(x)
print(out.shape)torch.Size([2, 3, 768])
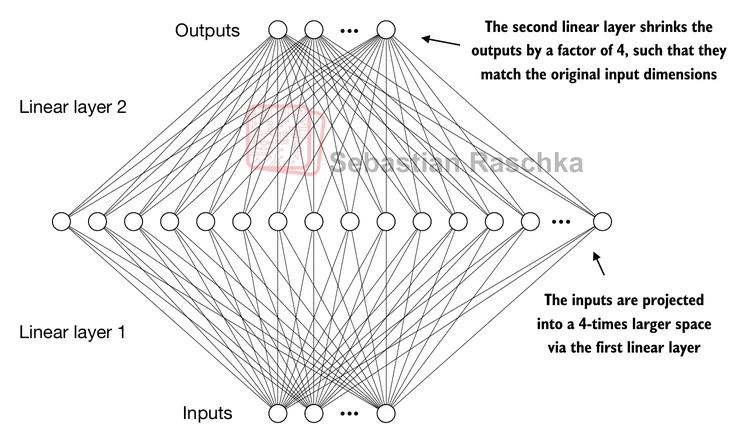
The expansion of dimensions in the FFN allows the model to project the input into a higher-dimensional space, giving it more capacity to learn complex relationships and patterns in the data before projecting it back down to the original embedding dimension in the second linear layer.
Shortcut connections
Shortcut connections, also called skip or residual connections.
Originally, shortcut connections were proposed in deep networks for computer vision (residual networks) to mitigate vanishing gradient problems.
This is achieved by adding the output of one layer to the output of a later layer, usually skipping one or more layers in between.
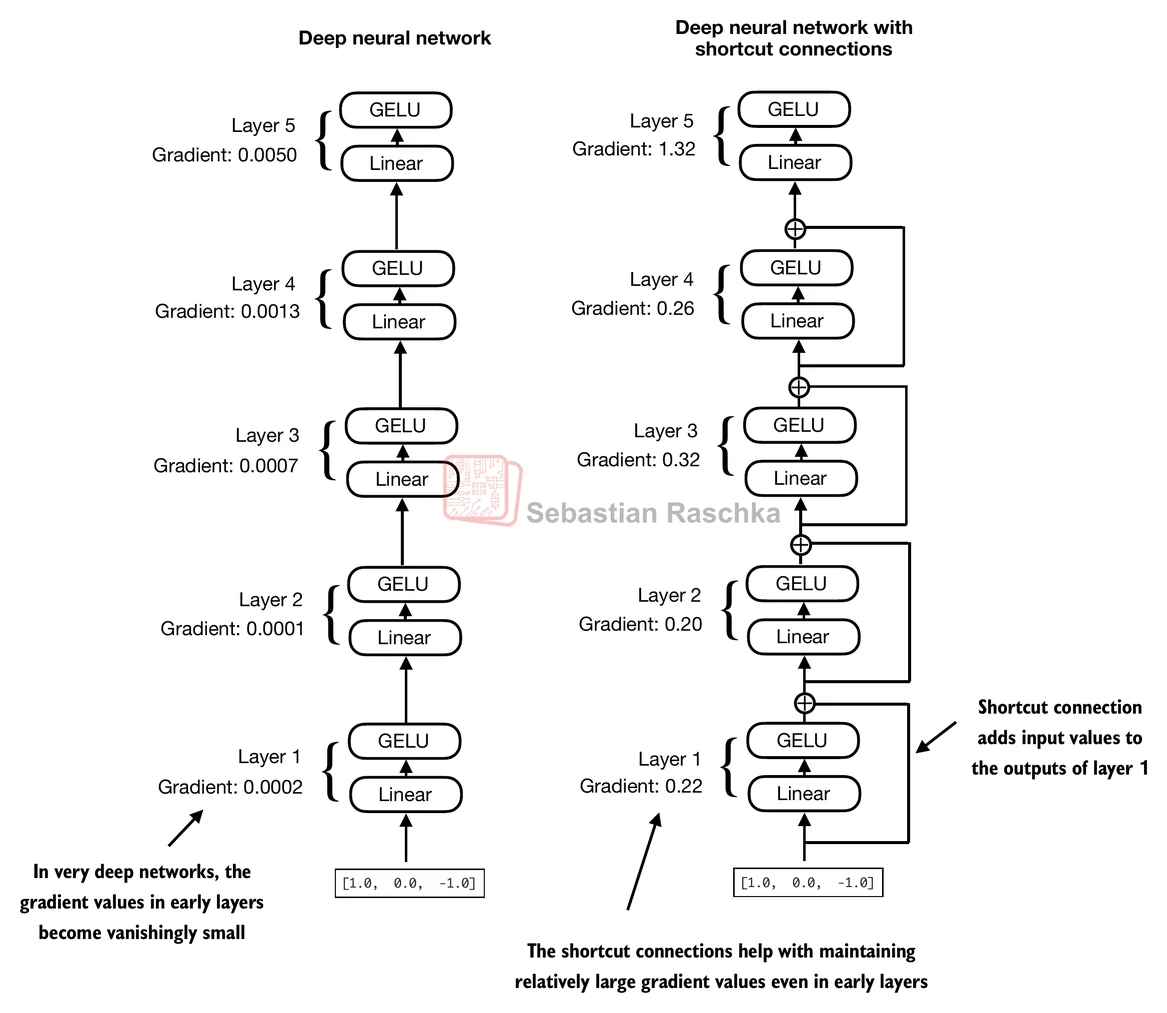
Let’s illustrate this idea (and the image above) with a small example network:
# 5) Shortcut connections
class ExampleDeepNeuralNetwork(nn.Module):
def __init__(self, layer_sizes, use_shortcut):
super().__init__()
self.use_shortcut = use_shortcut
self.layers = nn.ModuleList([
nn.Sequential(nn.Linear(layer_sizes[0], layer_sizes[1]), GELU()),
nn.Sequential(nn.Linear(layer_sizes[1], layer_sizes[2]), GELU()),
nn.Sequential(nn.Linear(layer_sizes[2], layer_sizes[3]), GELU()),
nn.Sequential(nn.Linear(layer_sizes[3], layer_sizes[4]), GELU()),
nn.Sequential(nn.Linear(layer_sizes[4], layer_sizes[5]), GELU())
])
def forward(self, x):
for layer in self.layers:
# Compute the output of the current layer
layer_output = layer(x)
# Check if shortcut can be applied
if self.use_shortcut and x.shape == layer_output.shape:
x = x + layer_output
else:
x = layer_output
return x
def print_gradients(model, x):
# Forward pass
output = model(x)
target = torch.tensor([[0.]])
# Calculate loss based on how close the target
# and output are
loss = nn.MSELoss()
loss = loss(output, target)
# Backward pass to calculate the gradients
loss.backward()
for name, param in model.named_parameters():
if 'weight' in name:
# Print the mean absolute gradient of the weights
print(f"{name} has gradient mean of {param.grad.abs().mean().item()}")Let’s print the gradient values first without shortcut connections:
layer_sizes = [3, 3, 3, 3, 3, 1]
sample_input = torch.tensor([[1., 0., -1.]])
torch.manual_seed(123)
model_without_shortcut = ExampleDeepNeuralNetwork(
layer_sizes, use_shortcut=False
)
print_gradients(model_without_shortcut, sample_input)layers.0.0.weight has gradient mean of 0.00020173584925942123
layers.1.0.weight has gradient mean of 0.00012011159560643137
layers.2.0.weight has gradient mean of 0.0007152040489017963
layers.3.0.weight has gradient mean of 0.0013988736318424344
layers.4.0.weight has gradient mean of 0.005049645435065031
Next, let’s print the gradient values with shortcut connections:
torch.manual_seed(123)
model_with_shortcut = ExampleDeepNeuralNetwork(
layer_sizes, use_shortcut=True
)
print_gradients(model_with_shortcut, sample_input)layers.0.0.weight has gradient mean of 0.22169792652130127
layers.1.0.weight has gradient mean of 0.20694106817245483
layers.2.0.weight has gradient mean of 0.32896995544433594
layers.3.0.weight has gradient mean of 0.2665732204914093
layers.4.0.weight has gradient mean of 1.3258540630340576
As we can see based on the output above, shortcut connections prevent the gradients from vanishing in the early layers (towards layer.0).
Connecting attention and linear layers in a transformer block
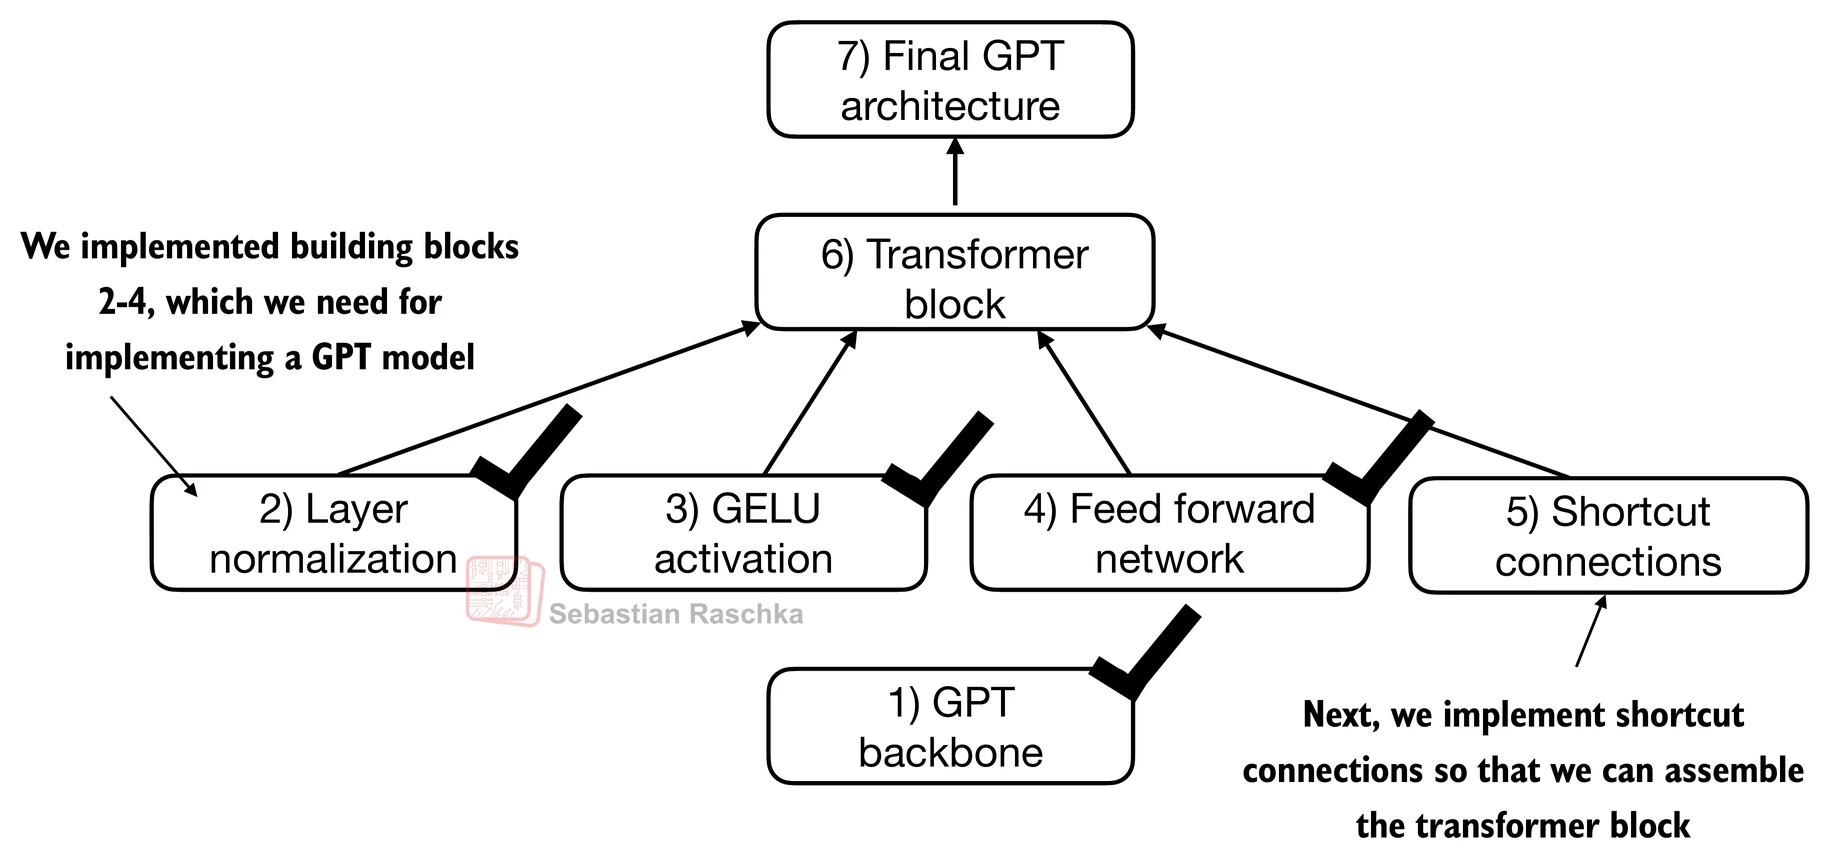
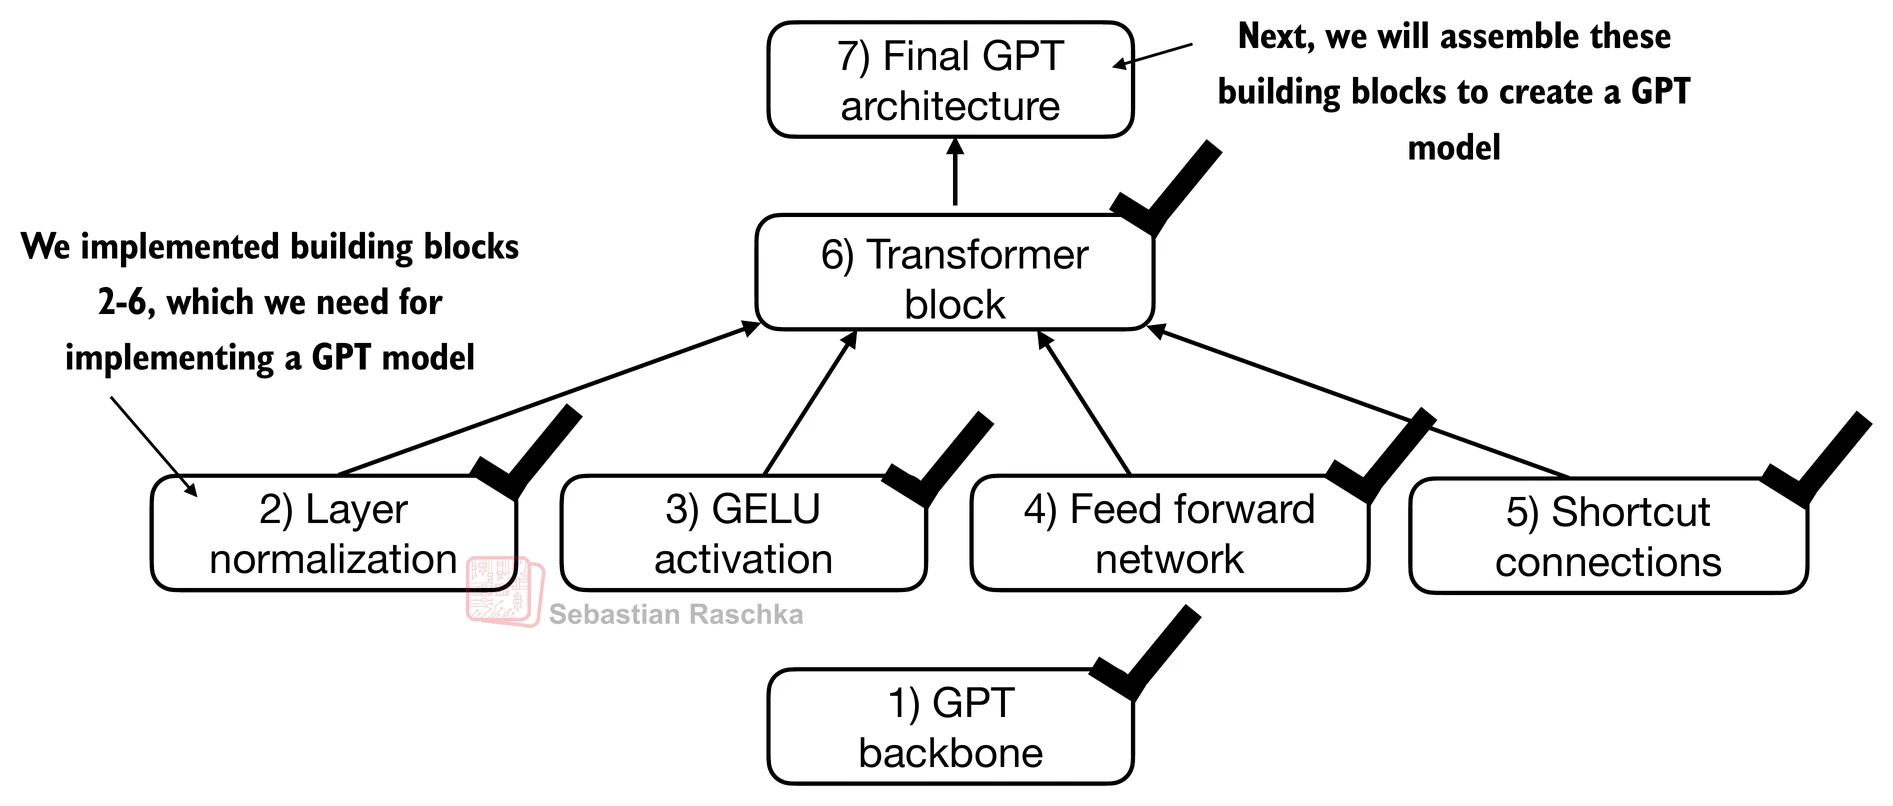
We now combine the previous concepts into a so-called transformer block.
A transformer block combines the causal multi-head attention module from the previous chapter with the linear layers, the feed forward neural network.
In addition, the transformer block also uses dropout and shortcut connections.
# Install Dr. Sebastian's packages for tutorial convenience.
!pip install -q llms-from-scratch# 6) Transformer block
from llms_from_scratch.ch03 import MultiHeadAttention
class TransformerBlock(nn.Module):
def __init__(self, cfg):
super().__init__()
self.att = MultiHeadAttention(
d_in=cfg["emb_dim"],
d_out=cfg["emb_dim"],
context_length=cfg["context_length"],
num_heads=cfg["n_heads"],
dropout=cfg["drop_rate"],
qkv_bias=cfg["qkv_bias"])
self.ff = FeedForward(cfg)
self.norm1 = LayerNorm(cfg["emb_dim"])
self.norm2 = LayerNorm(cfg["emb_dim"])
self.drop_shortcut = nn.Dropout(cfg["drop_rate"])
def forward(self, x):
# Shortcut connection for attention block
shortcut = x
x = self.norm1(x)
x = self.att(x) # Shape [batch_size, num_tokens, emb_size]
x = self.drop_shortcut(x)
x = x + shortcut # Add the original input back
# Shortcut connection for feed forward block
shortcut = x
x = self.norm2(x)
x = self.ff(x)
x = self.drop_shortcut(x)
x = x + shortcut # Add the original input back
return x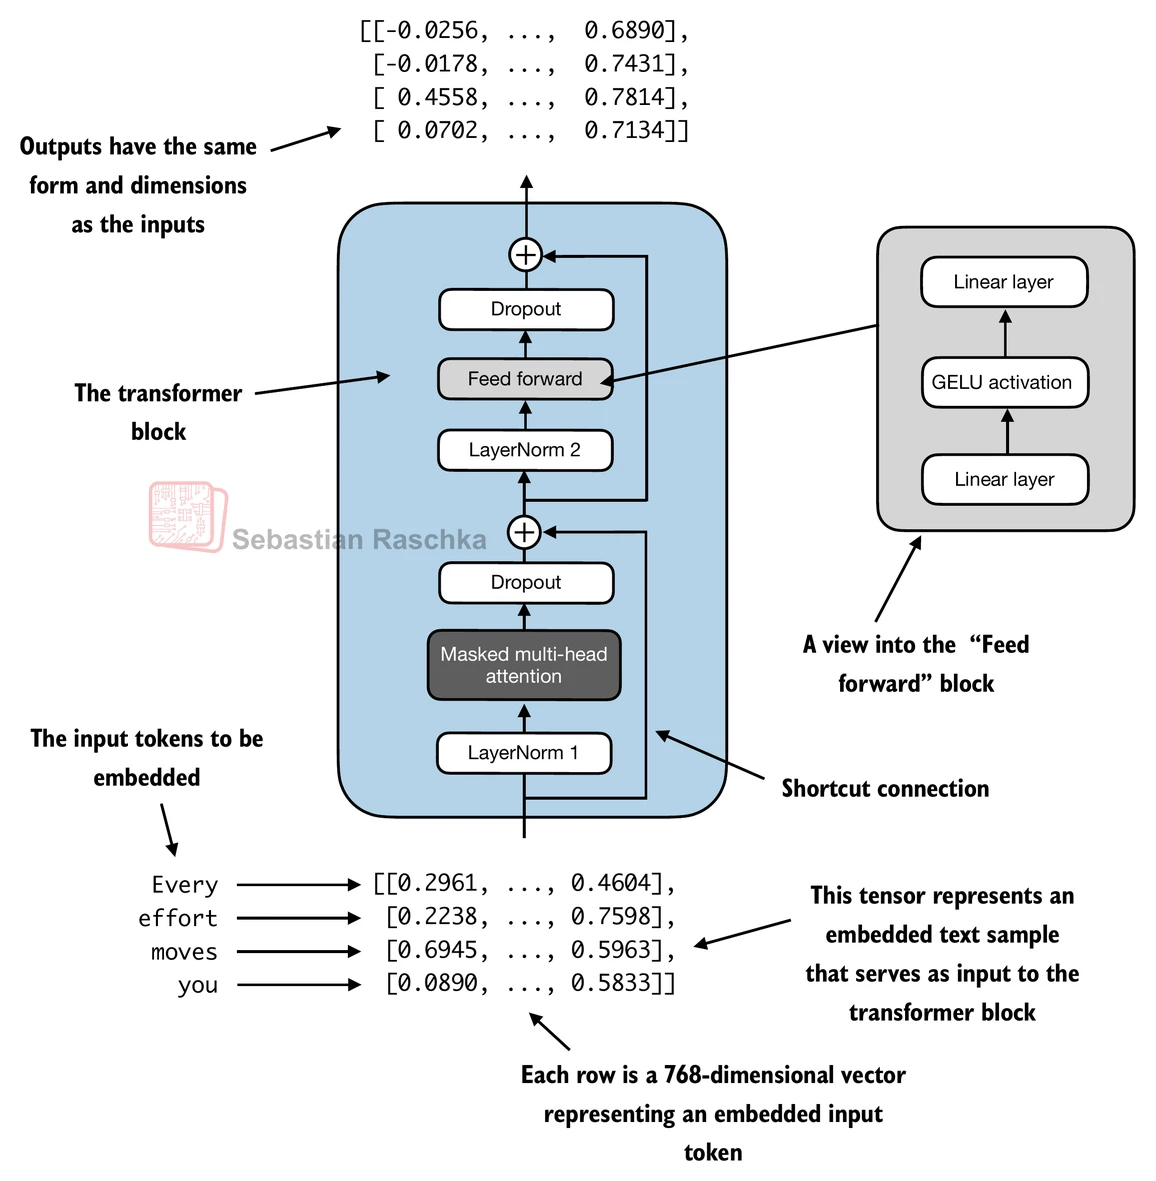
Suppose we have 2 input samples with 6 tokens each, where each token is a 768-dimensional embedding vector; then this transformer block applies self-attention, followed by linear layers, to produce an output of similar size.
torch.manual_seed(123)
x = torch.rand(2, 4, 768) # Shape: [batch_size, num_tokens, emb_dim]
block = TransformerBlock(GPT_CONFIG_124M)
output = block(x)
print("Input shape:", x.shape)
print("Output shape:", output.shape)Input shape: torch.Size([2, 4, 768])
Output shape: torch.Size([2, 4, 768])
Coding the GPT model
Now let’s plug in the transformer block into the architecture we coded at the very beginning of this chapter so that we obtain a usable GPT architecture.
Note that the transformer block is repeated multiple times; in the case of the smallest 124M GPT-2 model, we repeat it 12 times (see the figure below):
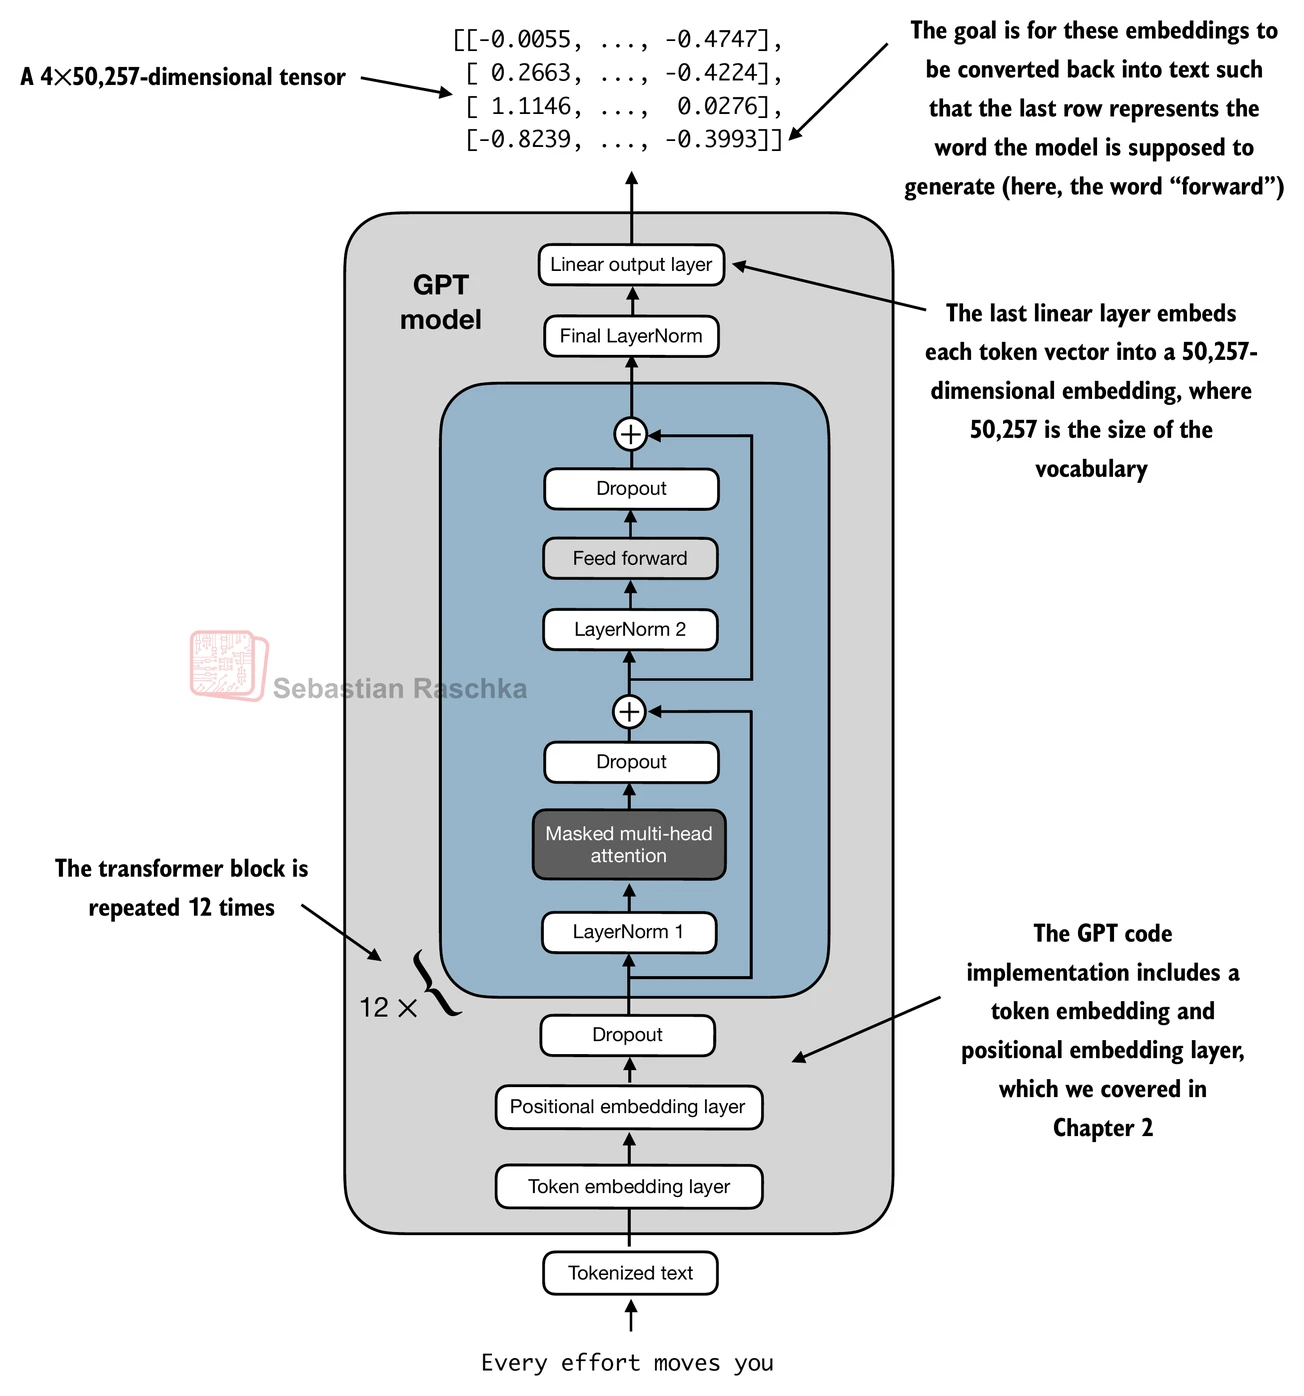
The corresponding code implementation, where cfg["n_layers"] = 12:
# 7) Final GPT structure
class GPTModel(nn.Module):
def __init__(self, cfg):
super().__init__()
self.tok_emb = nn.Embedding(cfg["vocab_size"], cfg["emb_dim"])
self.pos_emb = nn.Embedding(cfg["context_length"], cfg["emb_dim"])
self.drop_emb = nn.Dropout(cfg["drop_rate"])
self.trf_blocks = nn.Sequential(
*[TransformerBlock(cfg) for _ in range(cfg["n_layers"])])
self.final_norm = LayerNorm(cfg["emb_dim"])
self.out_head = nn.Linear(
cfg["emb_dim"], cfg["vocab_size"], bias=False
)
def forward(self, in_idx):
batch_size, seq_len = in_idx.shape
tok_embeds = self.tok_emb(in_idx)
pos_embeds = self.pos_emb(torch.arange(seq_len, device=in_idx.device))
x = tok_embeds + pos_embeds # Shape [batch_size, num_tokens, emb_size]
x = self.drop_emb(x)
x = self.trf_blocks(x)
x = self.final_norm(x)
logits = self.out_head(x)
return logitsUsing the configuration of the 124M parameter model, we can now instantiate this GPT model with random initial weights as follows:
torch.manual_seed(123)
model = GPTModel(GPT_CONFIG_124M)
out = model(batch)
print("Input batch:\n", batch)
print("\nOutput shape:", out.shape)
print(out)Input batch:
tensor([[6109, 3626, 6100,  345],
        [6109, 1110, 6622,  257]])
Output shape: torch.Size([2, 4, 50257])
tensor([[[ 0.3613, 0.4222, -0.0711, ..., 0.3483, 0.4661, -0.2838],
[-0.1792, -0.5660, -0.9485, ..., 0.0477, 0.5181, -0.3168],
[ 0.7120, 0.0332, 0.1085, ..., 0.1018, -0.4327, -0.2553],
[-1.0076, 0.3418, -0.1190, ..., 0.7195, 0.4023, 0.0532]],
[[-0.2564, 0.0900, 0.0335, ..., 0.2659, 0.4454, -0.6806],
[ 0.1230, 0.3653, -0.2074, ..., 0.7705, 0.2710, 0.2246],
[ 1.0558, 1.0318, -0.2800, ..., 0.6936, 0.3205, -0.3178],
[-0.1565, 0.3926, 0.3288, ..., 1.2630, -0.1858, 0.0388]]],
grad_fn=<UnsafeViewBackward0>)
Lastly, we can compute the memory requirements of the model as follows, which can be a helpful reference point:
# Calculate the total size in bytes (assuming float32, 4 bytes per parameter)
total_size_bytes = total_params * 4

# Convert to megabytes
total_size_mb = total_size_bytes / (1024 * 1024)

print(f"Total size of the model: {total_size_mb:.2f} MB")
Total size of the model: 621.83 MB
Exercise: you can try the following other configurations, which are referenced in the GPT-2 paper, as well.
GPT2-small (the 124M configuration we already implemented):
“emb_dim” = 768
“n_layers” = 12
“n_heads” = 12
GPT2-medium:
“emb_dim” = 1024
“n_layers” = 24
“n_heads” = 16
GPT2-large:
“emb_dim” = 1280
“n_layers” = 36
“n_heads” = 20
GPT2-XL:
“emb_dim” = 1600
“n_layers” = 48
“n_heads” = 25
Generating text
LLMs like the GPT model we implemented above are used to generate one word at a time.
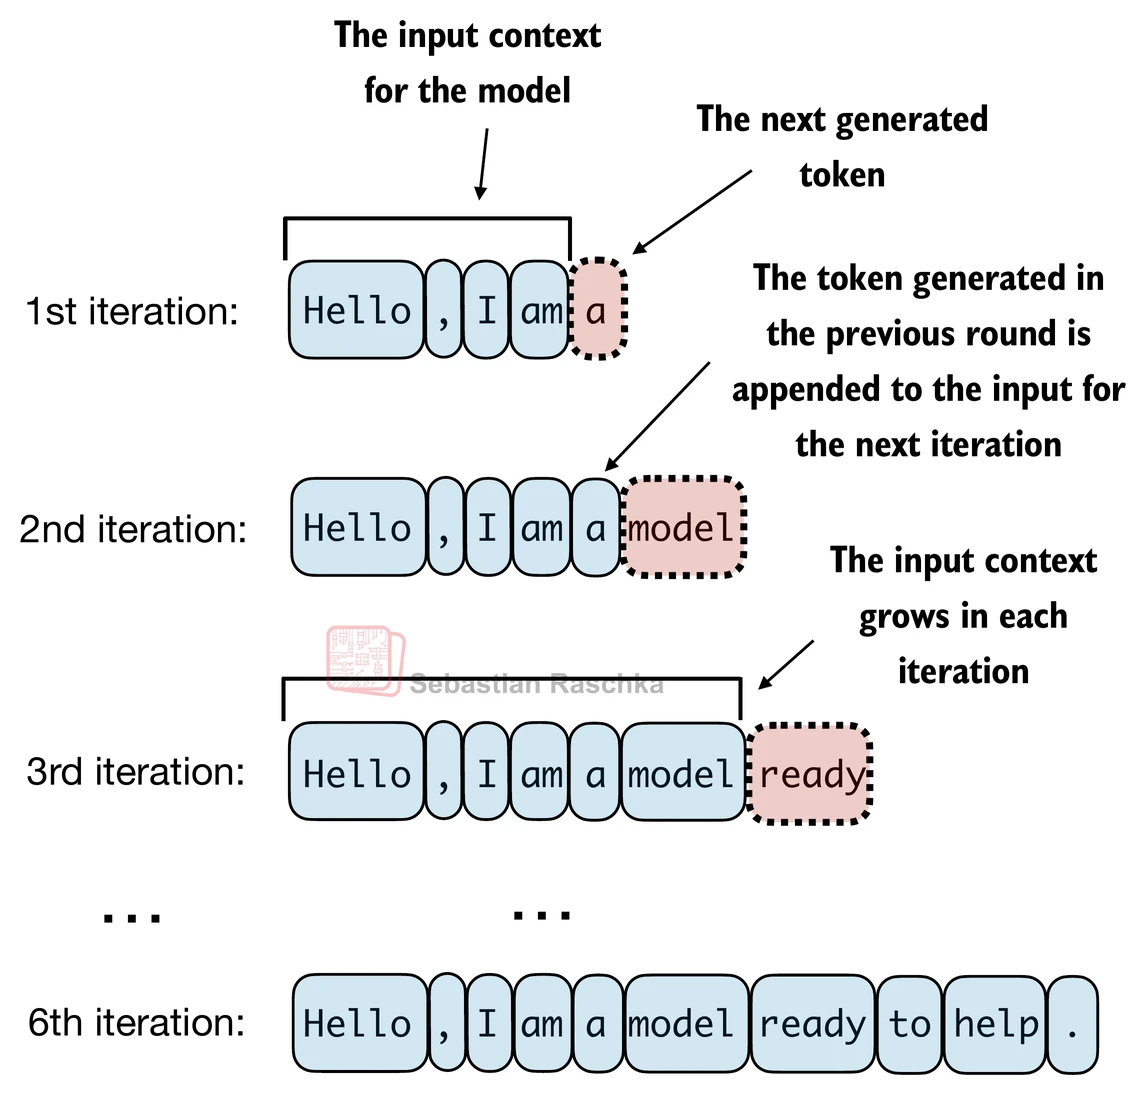
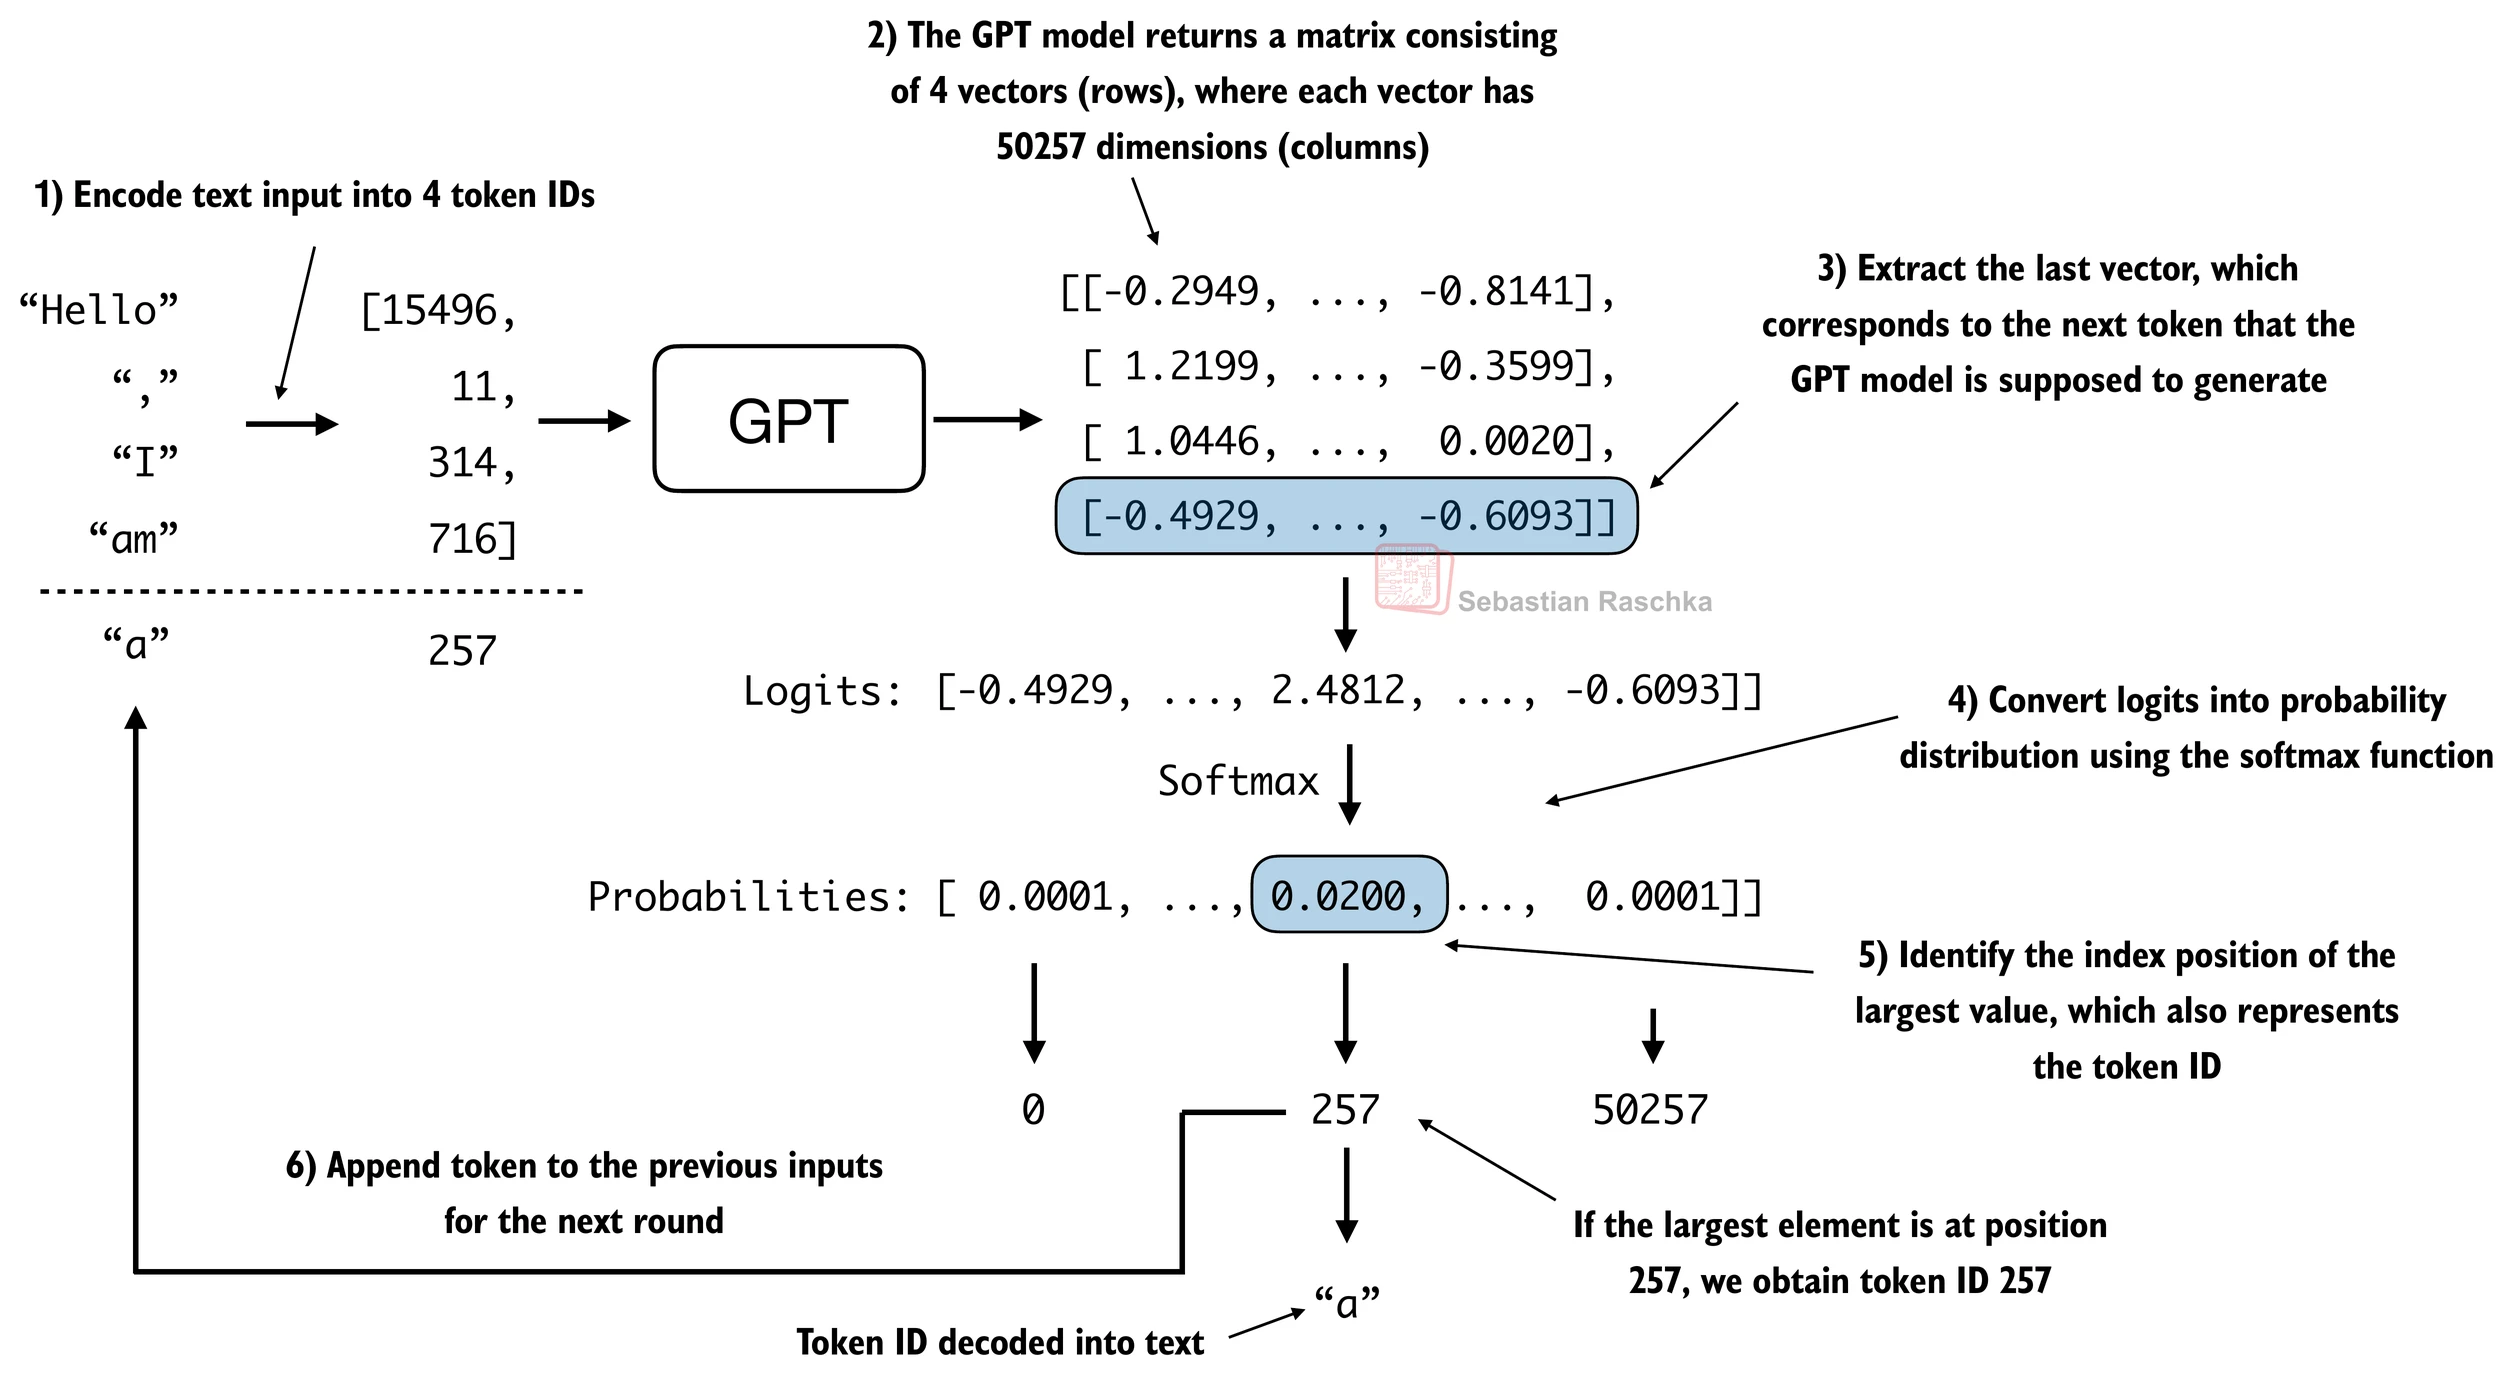
The following generate_text_simple function implements greedy decoding, which is a simple and fast method to generate text.
In greedy decoding, at each step, the model chooses the word (or token) with the highest probability as its next output (the highest logit corresponds to the highest probability, so we technically wouldn’t even have to compute the softmax function explicitly).
The figure below depicts how the GPT model, given an input context, generates the next word token:
def generate_text_simple(model, idx, max_new_tokens, context_size):
    # idx is (batch, n_tokens) array of indices in the current context
    for _ in range(max_new_tokens):

        # Crop current context if it exceeds the supported context size
        # E.g., if LLM supports only 5 tokens, and the context size is 10
        # then only the last 5 tokens are used as context
        idx_cond = idx[:, -context_size:]

        # Get the predictions
        with torch.no_grad():
            logits = model(idx_cond)

        # Focus only on the last time step
        # (batch, n_tokens, vocab_size) becomes (batch, vocab_size)
        logits = logits[:, -1, :]

        # Apply softmax to get probabilities
        probas = torch.softmax(logits, dim=-1)  # (batch, vocab_size)

        # Get the idx of the vocab entry with the highest probability value
        idx_next = torch.argmax(probas, dim=-1, keepdim=True)  # (batch, 1)

        # Append sampled index to the running sequence
        idx = torch.cat((idx, idx_next), dim=1)  # (batch, n_tokens+1)

    return idx
The generate_text_simple above implements an iterative process, where it creates one token at a time.
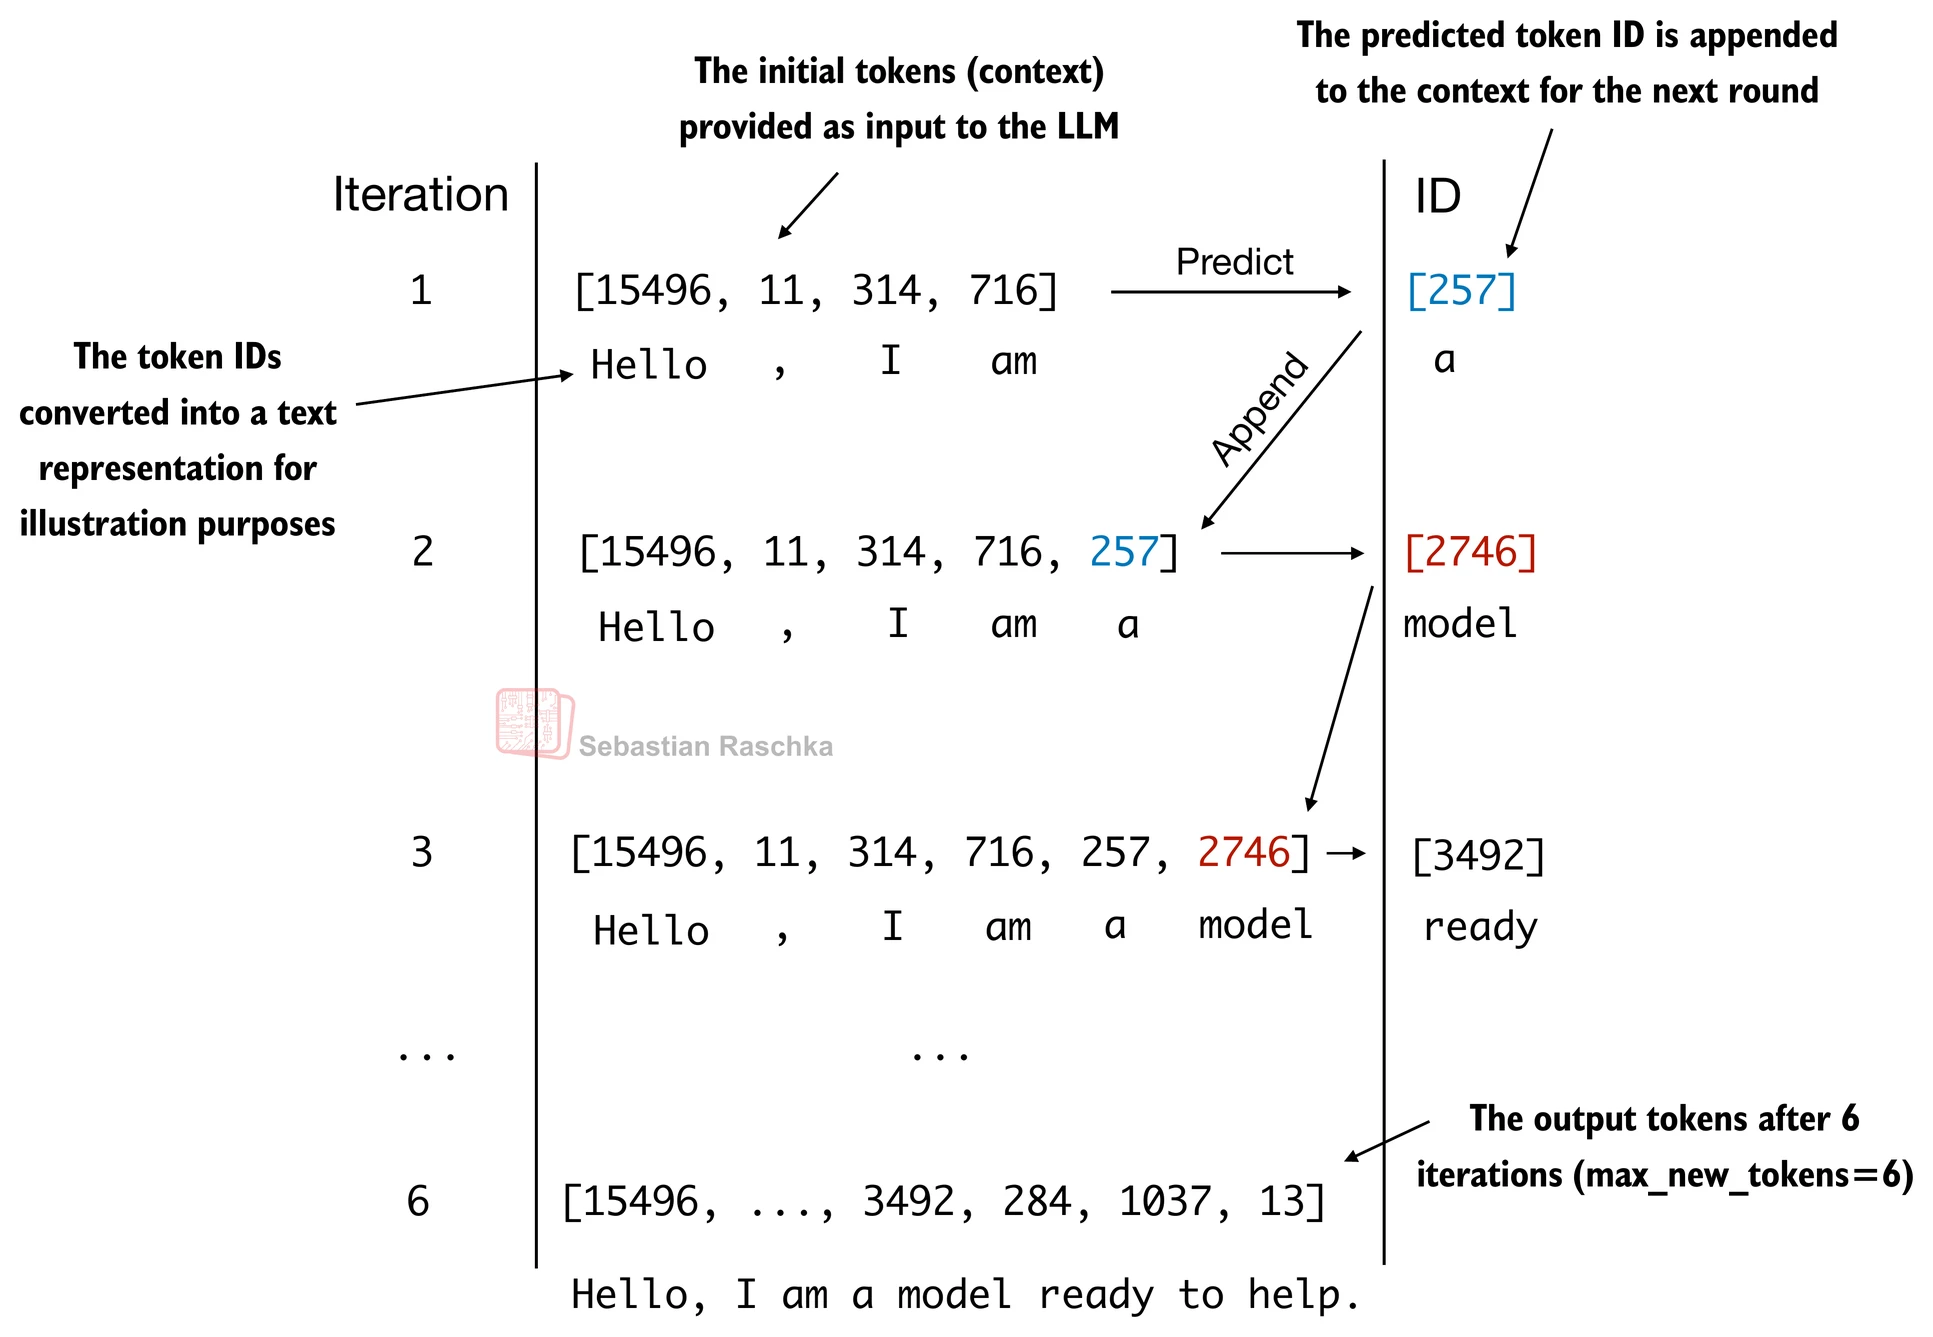
Let’s prepare an input example:
start_context = "Hello, I am"

encoded = tokenizer.encode(start_context)
print("encoded:", encoded)

encoded_tensor = torch.tensor(encoded).unsqueeze(0)
print("encoded_tensor.shape:", encoded_tensor.shape)
encoded: [15496, 11, 314, 716]
encoded_tensor.shape: torch.Size([1, 4])
model.eval() # disable dropout

out = generate_text_simple(
    model=model,
    idx=encoded_tensor,
    max_new_tokens=6,
    context_size=GPT_CONFIG_124M["context_length"]
)

print("Output:", out)
print("Output length:", len(out[0]))
Output: tensor([[15496, 11, 314, 716, 27018, 24086, 47843, 30961, 42348, 7267]])
Output length: 10
Remove batch dimension and convert back into text:
decoded_text = tokenizer.decode(out.squeeze(0).tolist())
print(decoded_text)
Hello, I am Featureiman Byeswickattribute argue
Note that the model is untrained; hence the random output texts above. We will train the model in the next chapter.
Interview Prep
See the ./gpt.py script, a self-contained script containing the GPT model we implement in this Jupyter notebook
You can find the exercise solutions in
. /exercise -solutions .ipynb